ESP32 Weather Station V2
This was an update to my original Weather Station Project from 2019 with the goal of adding more functionality and most importantly making it self-sufficient with a Solar Panel.
Summary
- COST: ~ $200 CAD
- Financing: Personal :(
- TIME TO COMPLETE: ~ 1 Months (~ 100 working hours)
- Ideation: 5 hours
- Design: 20 hours
- Mechanical Build: 10 hours
- Electrical Build: 40 hours
- Integration Hell: 20 hours
- Testing: 5 hours
Introduction
I know, I know this is ANOTHER Arduino Weather Station build on the internet. However, being able to capture data (nobody said accurate data…) on the world around us will always bring a smile to my face as a method of trying to understand this weird and fantastical planet.
In 2019, I installed the V1 version of the weather station with 11 environmental sensors. The station performed moderately well surviving a few big thunderstorms and 1 winter before failing the following spring. The biggest problem was that a large number of mechanical sensor systems (tipping bucket, wind vane, wind speed, and water level) suffered from reliability. Additionally, the system was large, required a nearby outlet, and was a bit of an eyesore. The system was begging for a V2!
 Version 1 of the Weather Station
Build
Mechanical Design
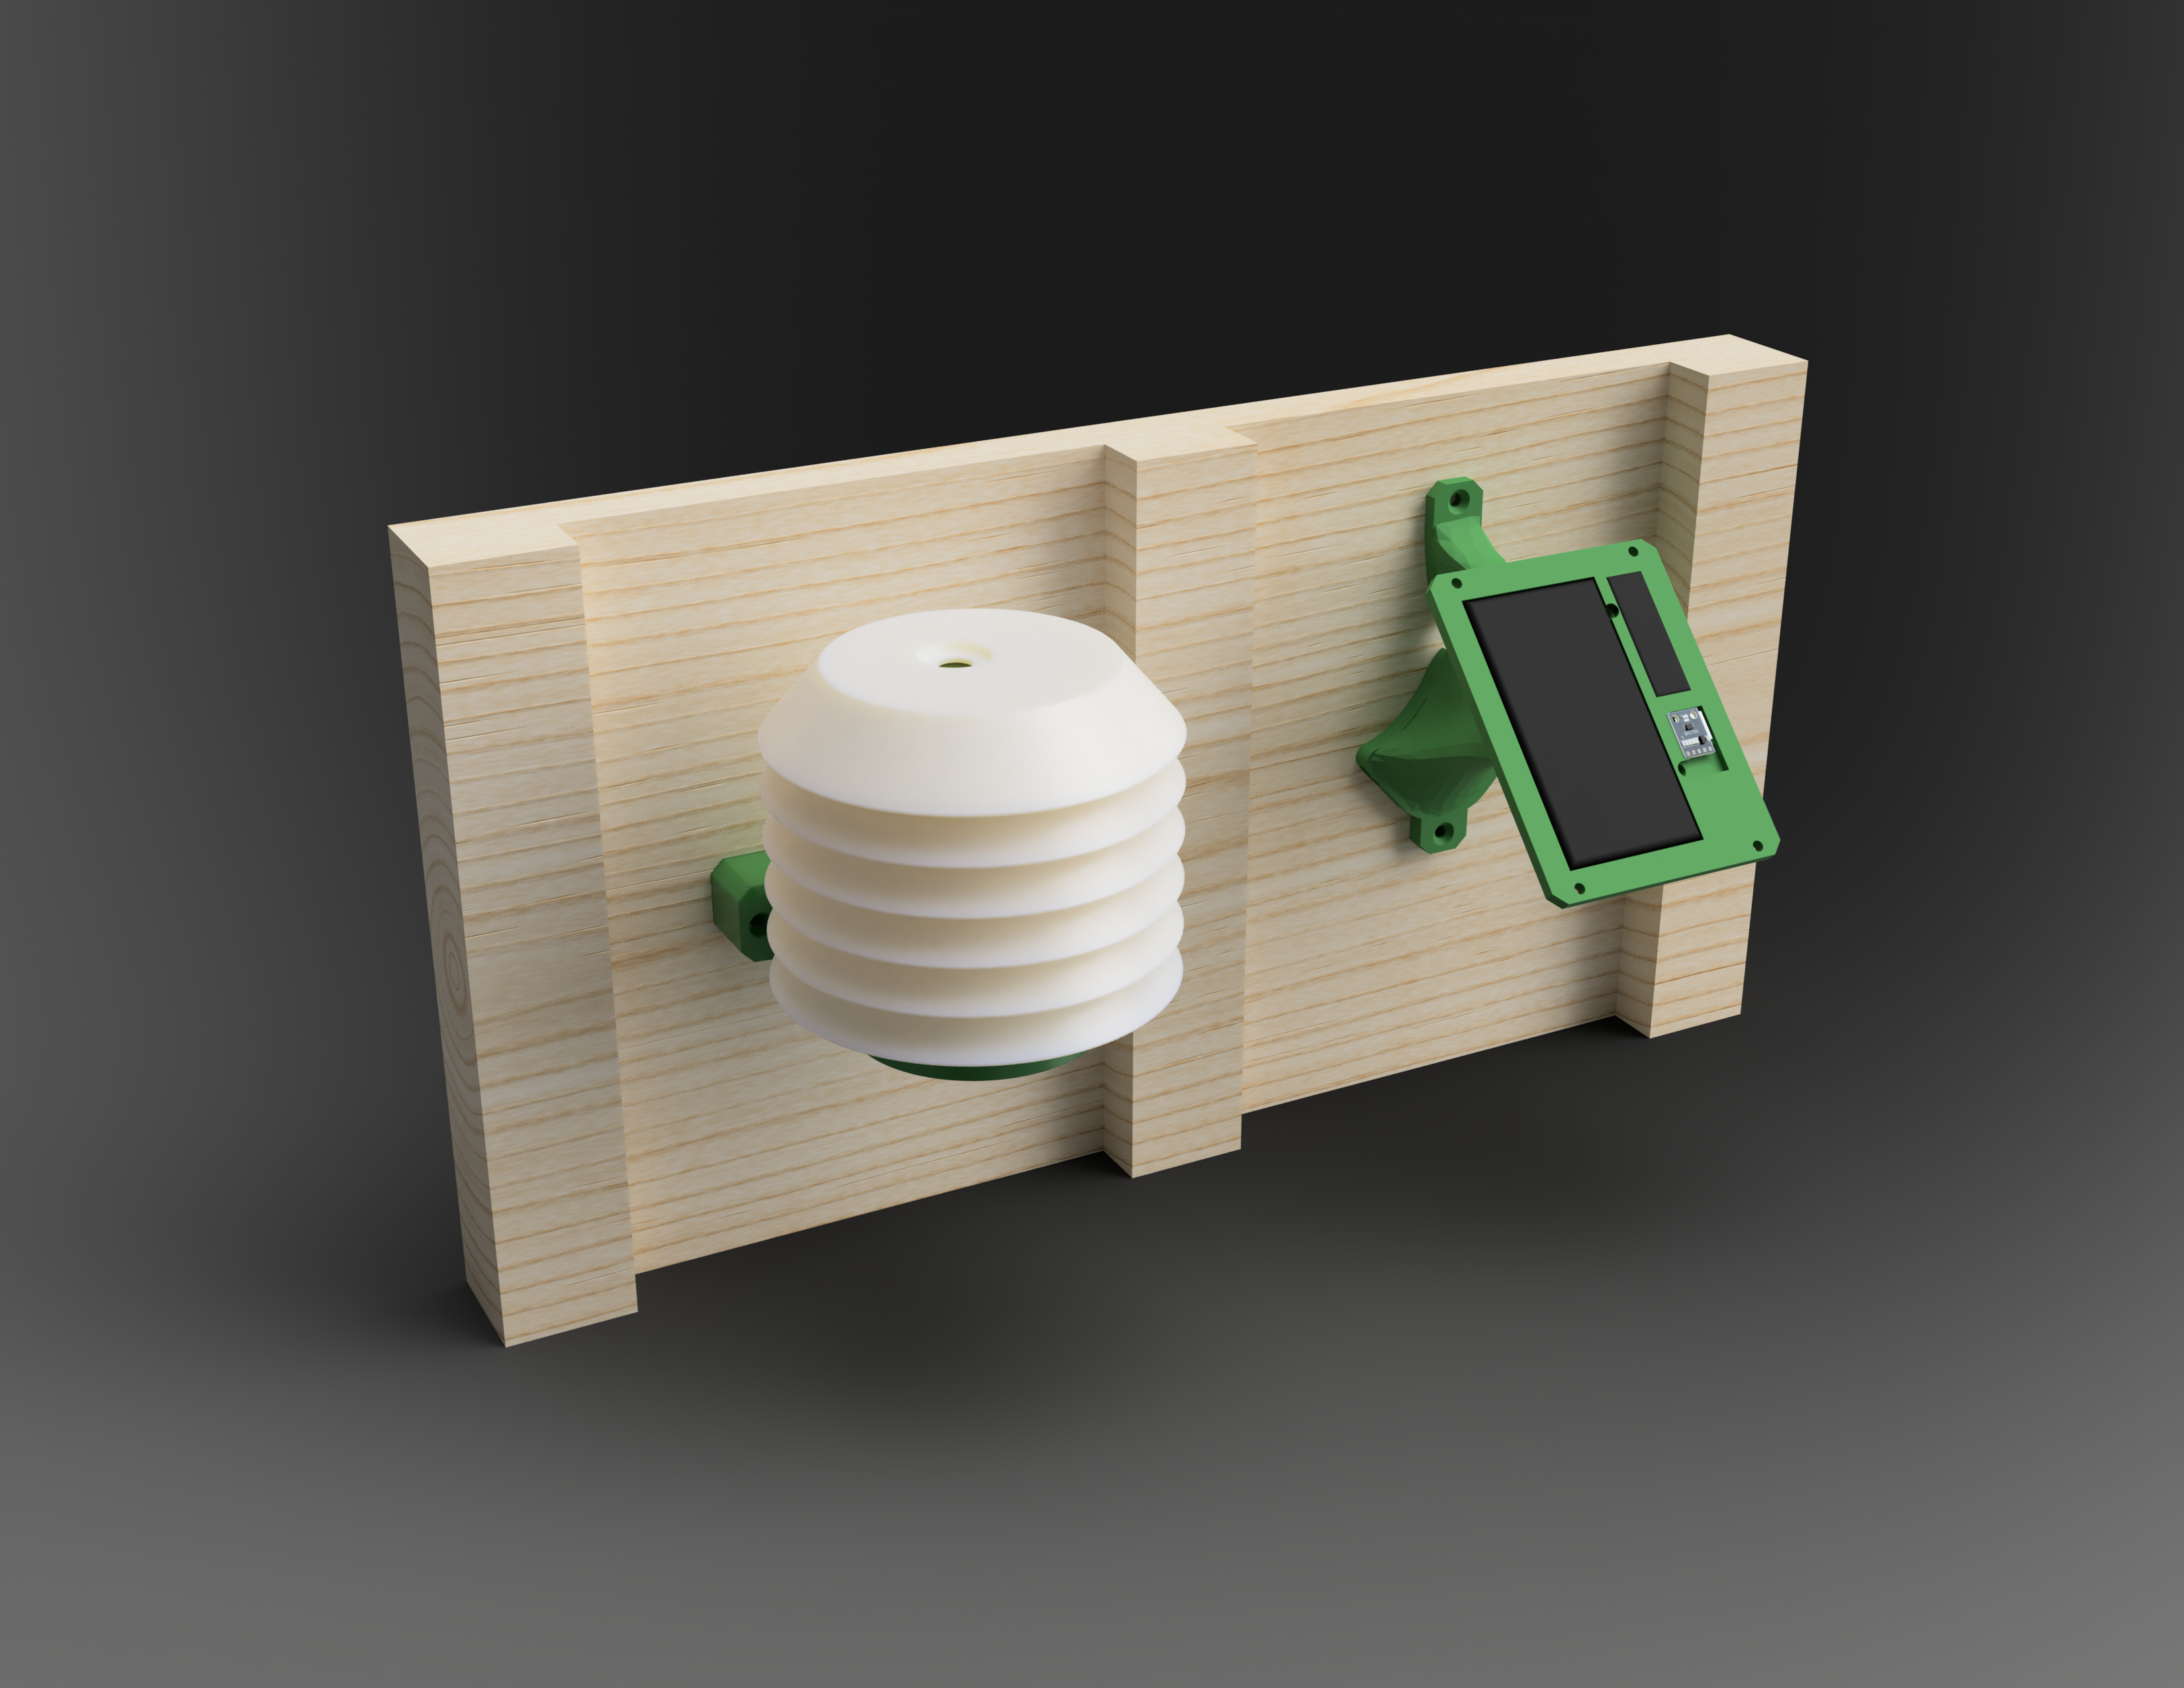
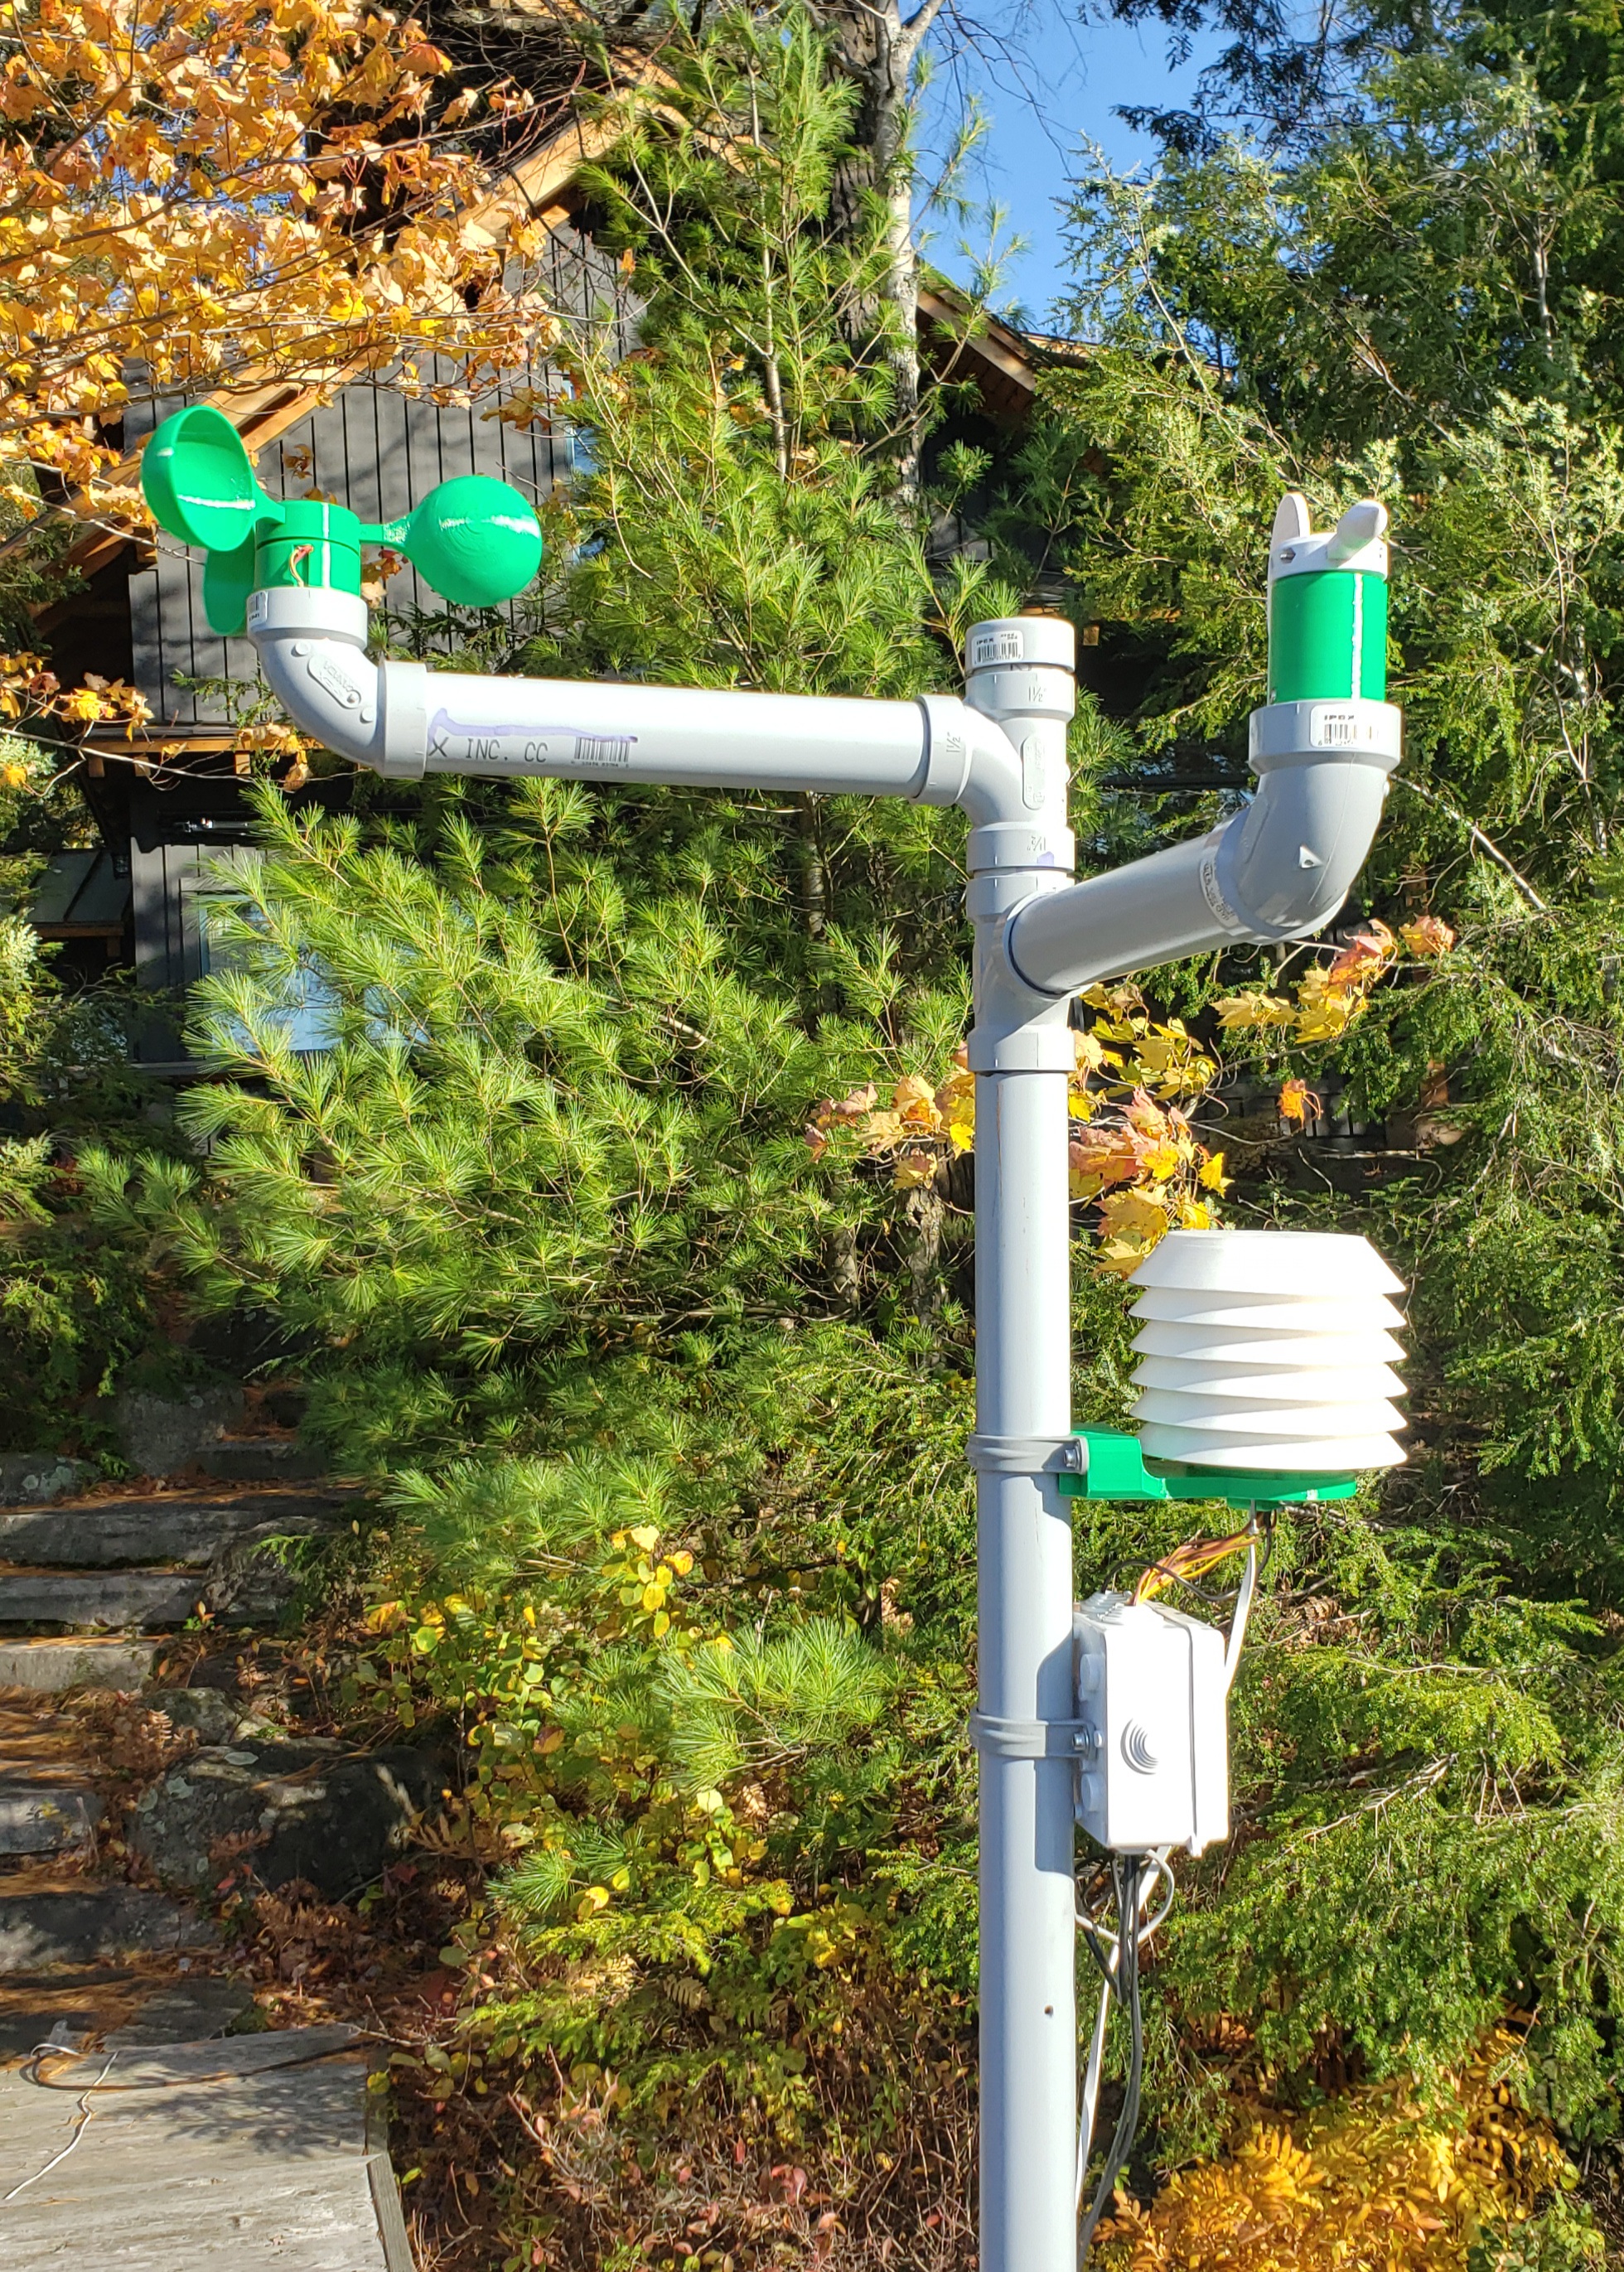
The core body of the V2 weather station is located within a Stevenson Shield I designed which helps block direct UV radiation and rainfall while allowing airflow over the electronics. Located within the Stevenson shield is the main processor (Heltec ESP32 - Lora V2), solar charging board, 18650 Li-ion cell as well as the sensors to measure air temperature, pressure, and humidity.
Additionally, I had some fun in this project designing the external sensor mount for the Solar Panel, Micro solar panel to measure irradiance, and light sensor. I used generative stiffness/mass optimization on the part assuming all wind loads will act normally to the slanted face to generate a cool organic structure. All 3D printed parts were printed out of PETG for its superior water and UV resistance to PLA.
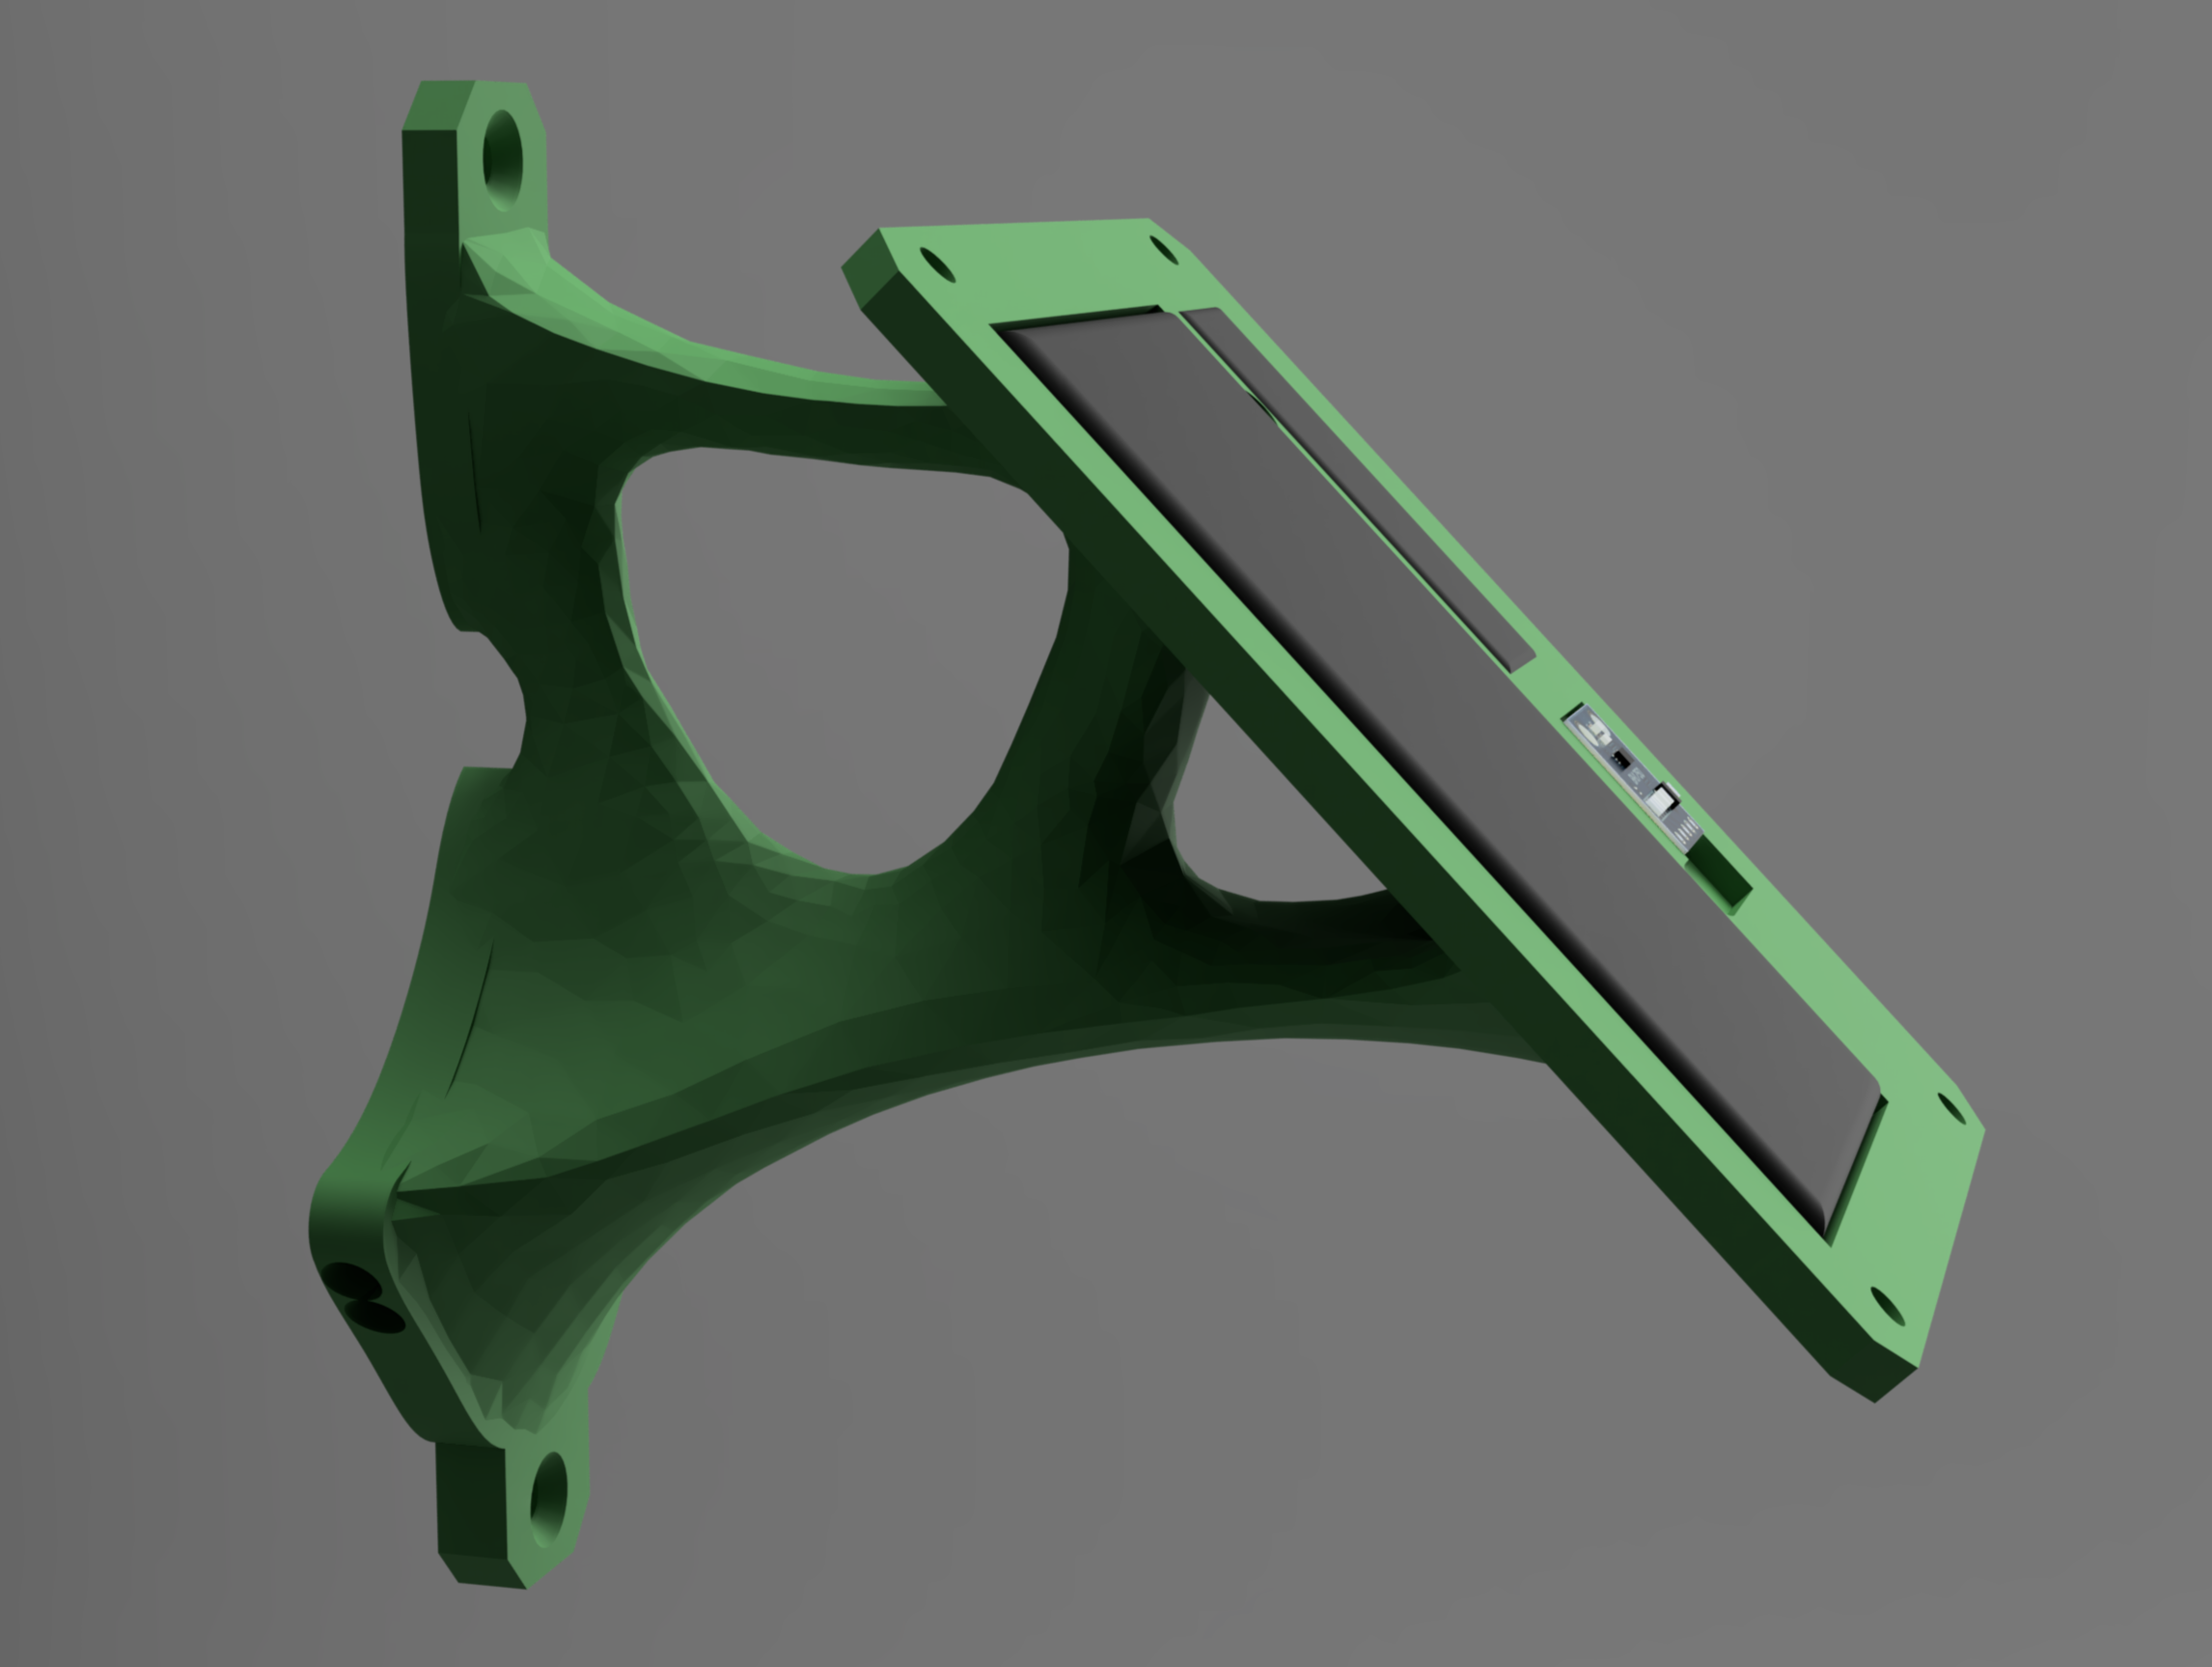 External Sensor Mount
Additionally, the organic design allowed to route the wires through the connecting arms which looks really cool when 3D printed with Transparent PETG.
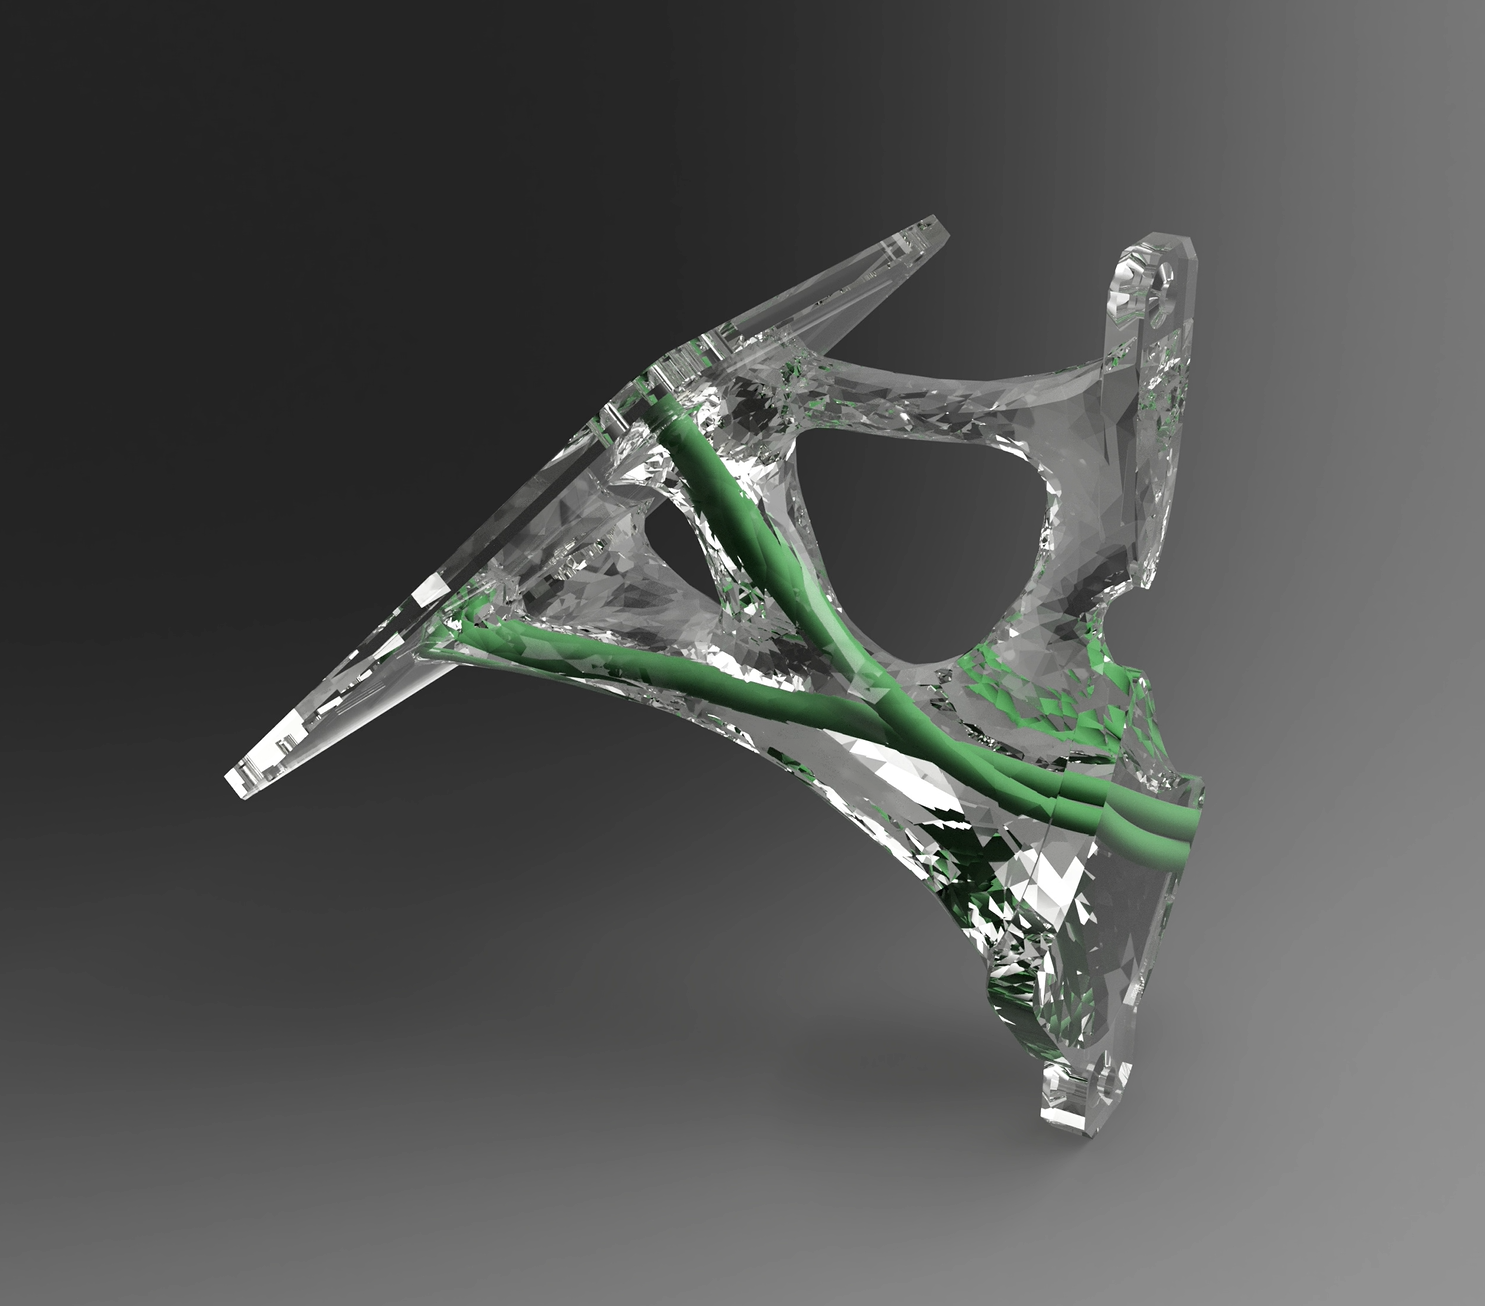 Can see the wires routed through the organic structure
I later found in my research that acrylic or glass blocks most of UVB and 50% of UVA. The project didn’t have the budget for Vitreous quartz or sapphire windows so sadly had to remove the UV sensor.
Electrical Design
To start I needed to determine how big a solar panel I would need to power the system throughout the year including the winter. Luckily the ESP32 is very efficient in deep sleep mode and only draws around 0.011mA at 3.3V. Knowing how long it takes to send the data packet over wifi to the Blynk Server alongside solar irradiance averages over the last 20 years for the direction and angle I was facing I determined I needed a 5x5 cm panel. I opted for a 5x10 cm panel as a safety factor.
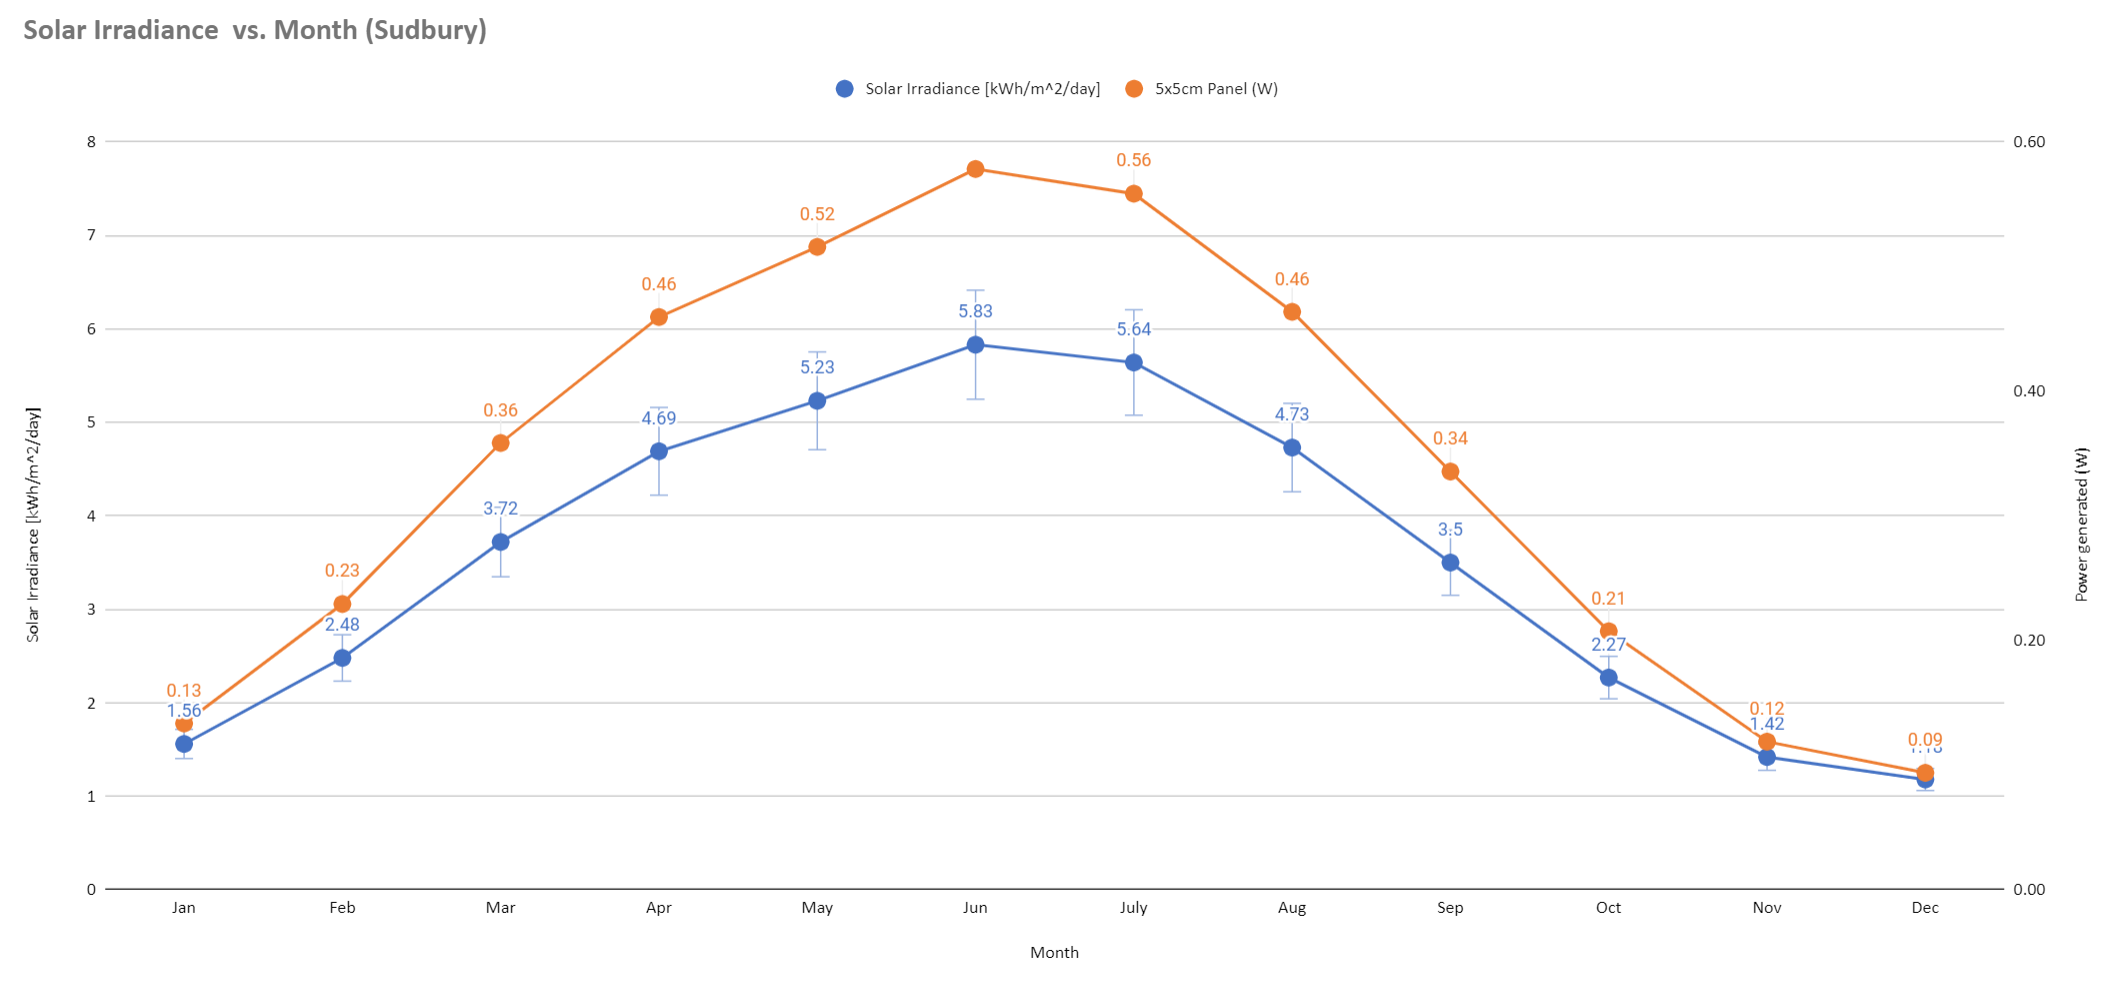 Solar Irradiance and Estimated power generation from 5x5cm panel
Sensors
Below is an overview of the sensors used in each version of the weather station.
| Description | Weather Station V1 | Weather Station V2 |
|---|---|---|
| Microcontroller | Heltec ESP32 | Heltec ESP32 |
| Air Temperature (°C) | HDC1080 | HDC1080 |
| Air Pressure (Pa) | BME280 | BME280 |
| Air Humidity (%) | HDC1080 | HDC1080 |
| Water Temperature (°C) - 1m | DS18B20 | DS18B20 |
| Water Temperature (°C) - 5m | N/A | DS18B20 |
| Rainfall (mm) | A3144 Hall Sensor | N/A |
| Water Level (mm) | JSN-SR04T | N/A |
| Wind Speed (m/s) | A3144 Hall Sensor | N/A |
| Wind Direction | Optical Encoder | N/A |
| Solar Irradiance | N/A | 3x2cm Panel & Current Sensor |
| Power Source | DC 5V | Solar |
| Features | Wifi Signal Strength | Battery Level, Zambretti Forcasting |
All sensors in Weather Station V2 were calibrated in some form using a variety of methods. The temperature sensors were calibrated against a thermocouple from 0-100°C (ice bath heated to boiling) while other sensors such as solar irradiance were calibrated against multimeter current readings.
All data was sent to the Blynk servers which can then be pulled to your phone over wifi through a snazzy little dashboard.
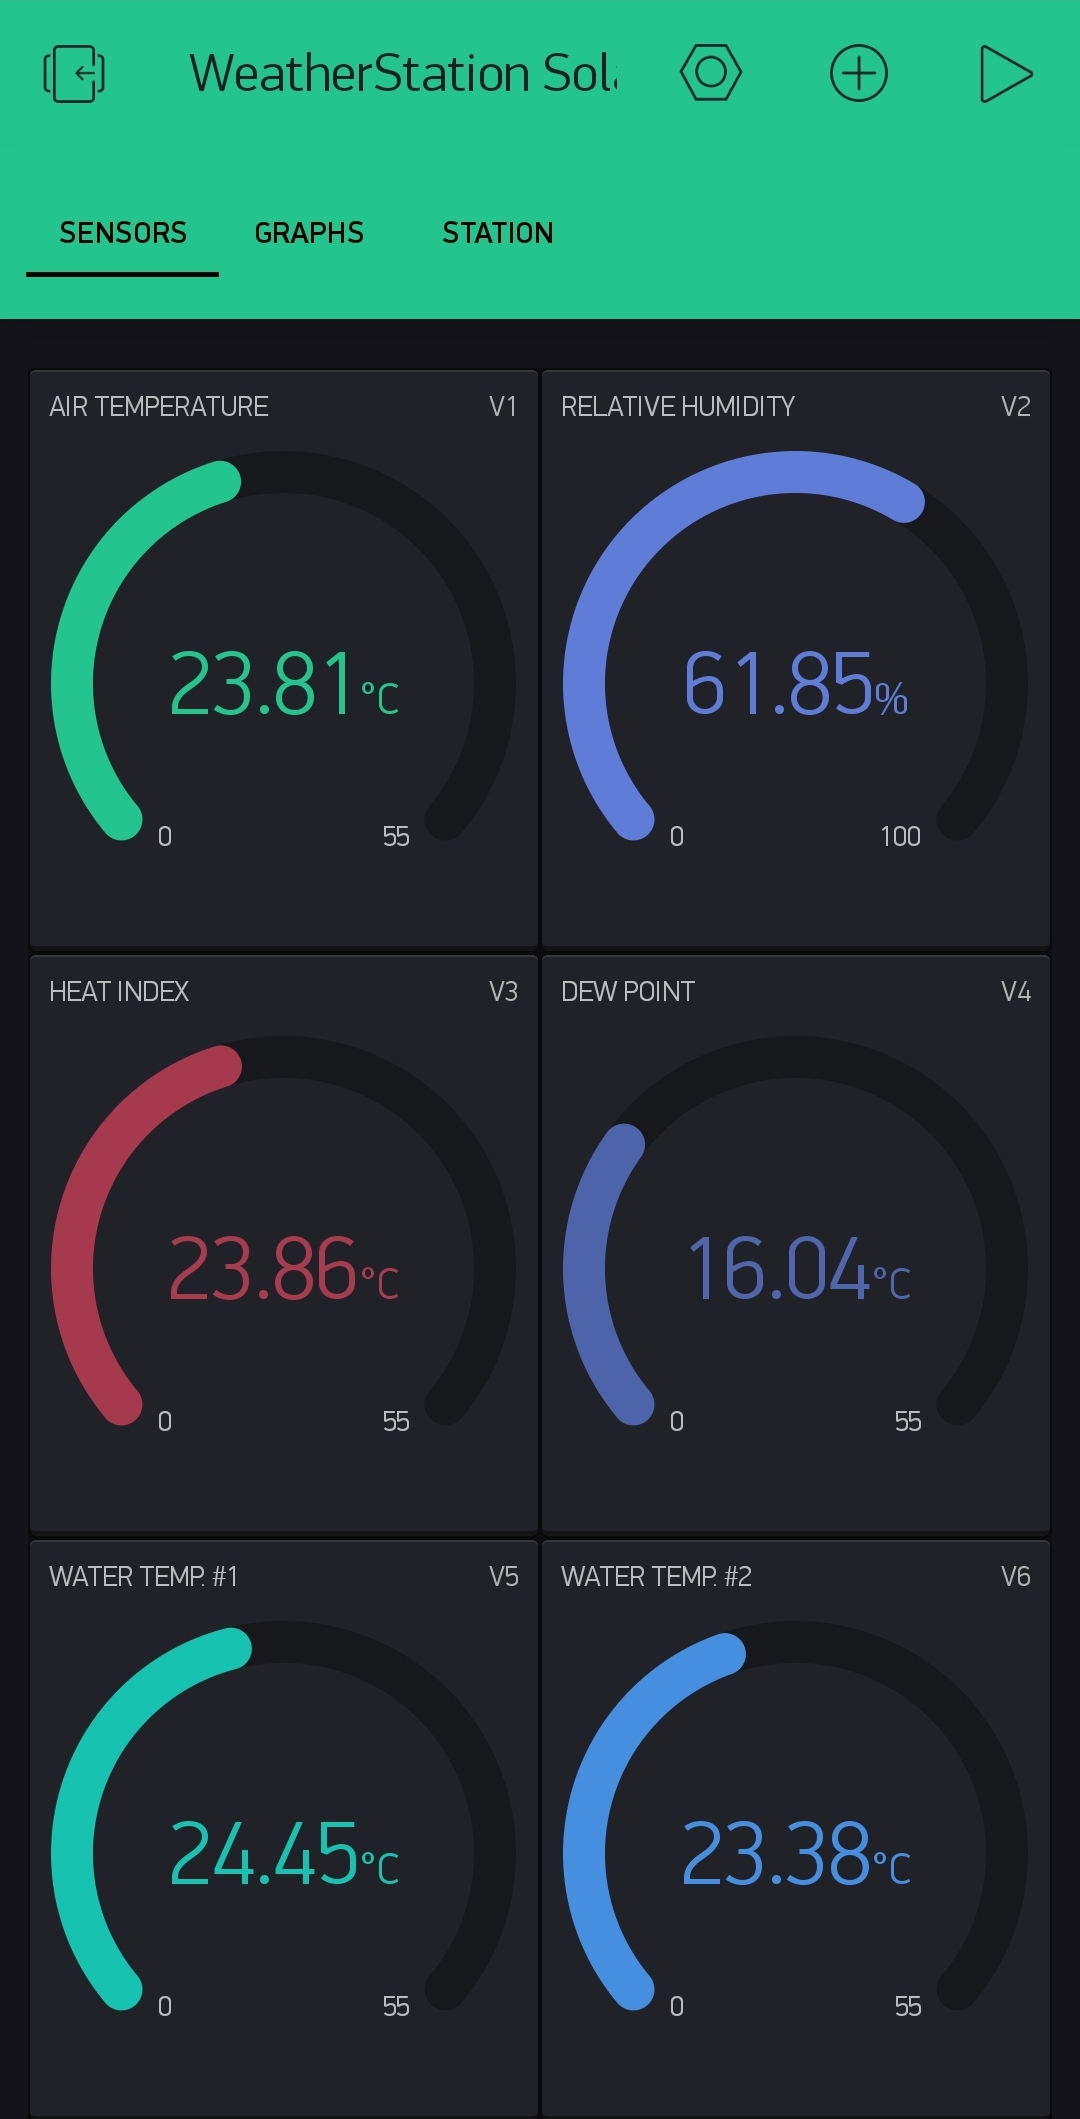 Overview of some of the sensor readings on my dashboard
Code - Solar Edition
Below is some of the code I used on the V2 solar weather station project - I hope you will find it useful for your projects!
1
2
3
4
5
6
7
8
9
10
11
12
13
14
15
16
17
18
19
20
21
22
23
24
25
26
27
28
29
30
31
32
33
34
35
36
37
38
39
40
41
42
43
44
45
46
47
48
49
50
51
52
53
54
55
56
57
58
59
60
61
62
63
64
65
66
67
68
69
70
71
72
73
74
75
76
77
78
79
80
81
82
83
84
85
86
87
88
89
90
91
92
93
94
95
96
97
98
99
100
101
102
103
104
105
106
107
108
109
110
111
112
113
114
115
116
117
118
119
120
121
122
123
124
125
126
127
128
129
130
131
132
133
134
135
136
137
138
139
140
141
142
143
144
145
146
147
148
149
150
151
152
153
154
155
156
157
158
159
160
161
162
163
164
165
166
167
168
169
170
171
172
173
174
175
176
177
178
179
180
181
182
183
184
185
186
187
188
189
190
191
192
193
194
195
196
197
198
199
200
201
202
203
204
205
206
207
208
209
210
211
212
213
214
215
216
217
218
219
220
221
222
223
224
225
226
227
228
229
230
231
232
233
234
235
236
237
238
239
240
241
242
243
244
245
246
247
248
249
250
251
252
253
254
255
256
257
258
259
260
261
262
263
264
265
266
267
268
269
270
271
272
273
274
275
276
277
278
279
280
281
282
283
284
285
286
287
288
289
290
291
292
293
294
295
296
297
298
299
300
301
302
303
304
305
306
307
308
309
310
311
312
313
314
315
316
317
318
319
320
321
322
323
324
325
326
327
328
329
330
331
332
333
334
335
336
337
338
339
340
341
342
343
344
345
346
347
348
349
350
351
352
353
354
355
356
357
358
359
360
361
362
363
364
365
366
367
368
369
370
371
372
373
374
375
376
377
378
379
380
381
////------------------------------------------------------------------------------------------------------
//Weather Station V6.1 - Solar Edition//
////------------------------------------------------------------------------------------------------------
//---------------- Blynk/Wifi COnfiguration
#include <WiFi.h>
#include <WiFiClient.h>
#include <BlynkSimpleEsp32.h>
char auth[] = "XXXXXX";
// Your WiFi credentials.
// Set password to "" for open networks.
char ssid[] = "XXXXXX";
char pass[] = "XXXXXX";
BlynkTimer timer;
bool on = 0;
bool online = 0;
WidgetLED led1(V19);
////-------------------------------------------

//HDC1080 Setup
#include "HDC1080JS.h"
HDC1080JS tempsensor;
float TempC;
float Hum;
float heatInd;

//DS18B20 Setup
// Include the libraries we need
#include <OneWire.h>
#include <DallasTemperature.h>

// Data wire is connected to GPIO15
#define ONE_WIRE_BUS 15
// Setup a oneWire instance to communicate with a OneWire device
OneWire oneWire(ONE_WIRE_BUS);
// Pass our oneWire reference to Dallas Temperature sensor
DallasTemperature sensors(&oneWire);

// Addresses of 2 DS18B20s
DeviceAddress sensor1 = { 0x28, 0x29, 0x6E, 0x79, 0xA2, 0x00, 0x03, 0xED };
DeviceAddress sensor2 = { 0x28, 0x2D, 0xB6, 0x79, 0xA2, 0x00, 0x03, 0x51 };

//BH1750 Setup
#include <Wire.h>
#include <ErriezBH1750.h>
BH1750 sensor(LOW);
uint16_t lux;

//ML8511
int UVOUT = 12; //Output from the sensor
int REF_3V3 = 14; //3.3V power on the ESP32 board
int uvLevel;
int refLevel;
float outputVoltage;
float uvIntensity;

//BME280 lightweight library
#include <forcedClimate.h>
ForcedClimate climateSensor = ForcedClimate();

//WCS Current Senors - Irradiance W/m^2
#include <Ewma.h>
Ewma adcFilter2(0.01);  // More smoothing - less prone to noise, but slower to detect changes
const float mVperAmpValue = 5729.450826; //WCS Sensitivity is 7000mV/A
const float moduleMiddleVoltage = 1650; // key in middle voltage value in mV. For 5V power supply key in 2500
const float moduleSupplyVoltage = 3300;
const float ShortCircuitCurrentSTC = 0.1   ;      // Key in the Short Circuit Current (At STC condition) of your Solar Panel or Solar Cell. Value 9 showing 9.0A Isc Panel.
float finalCurrent ;                        /* the final current reading without taking offset value*/
float Irradiation = 0.00;                   /* This shows the irradiation level in W/m2.*/
float Offset = 122;

double heatIndex( double T, double RH ) {
  double HI = 0.5 * (T + 61.0 + ((T - 68.0) * 1.2) + (RH * 0.094)); // Steadman's approximation (<80F)
  if (HI > 80.0)
  {
    //Rothfusz regression https://www.wpc.ncep.noaa.gov/html/heatindex_equation.shtml
    HI = -42.379 + 2.04901523 * T + 10.14333127 * RH - .22475541 * T * RH - .00683783 * T * T - .05481717 * RH * RH + .00122874 * T * T * RH + .00085282 * T * RH * RH - .00000199 * T * T * RH * RH;
    if ( RH < 13.0 && T >= 80.0 && T <= 112.0)
    {
      HI -= ((13.0 - RH) / 4) * sqrt((17.0 - abs(T - 95.0)) / 17);
      HI = HI;
    }
    else if (RH > 85.0 && T >= 80.0 && T <= 87.0 )
    {
      HI += ((RH - 85) / 10) * ((87 - T) / 5);
    }
  }
  return 0.55555 * (HI - 32); // Convert back from Farenheit
}

double dewPointFast(double celsius, double humidity)
{
  // 5x faster than dewPoint()
  // reference: http://en.wikipedia.org/wiki/Dew_point
  double a = 17.271;
  double b = 237.7;
  double temp = (a * celsius) / (b + celsius) + log(humidity * 0.01);
  double Td = (b * temp) / (a - temp);
  return Td;
}

void LuxRead() {
  // BH1750
  // Power on and start conversion
  sensor.startConversion();
  // Wait for completion (blocking busy-wait delay)
  if (sensor.waitForCompletion()) {
    // Read light
    lux = sensor.read();
  }
}

int averageAnalogRead(int pinToRead)
{
  byte numberOfReadings = 25;
  unsigned int runningValue = 0;

  for (int x = 0 ; x < numberOfReadings ; x++)
    runningValue += analogRead(pinToRead);
  runningValue /= numberOfReadings;

  return (runningValue);
}

float mapfloat(float x, float in_min, float in_max, float out_min, float out_max)
{
  return (x - in_min) * (out_max - out_min) / (in_max - in_min) + out_min;
}

String readBattery(){
  uint8_t percentage = 100;
  float voltage = ReadVoltage(27) / 4096.0 * 7.10;      // LOLIN D32 (no voltage divider need already fitted to board.or NODEMCU ESP32 with 100K+100K voltage divider
  //float voltage = analogRead(39) / 4096.0 * 7.23;    // NODEMCU ESP32 with 100K+100K voltage divider added
  //float voltage = analogRead(A0) / 4096.0 * 4.24;    // Wemos / Lolin D1 Mini 100K series resistor added
  //float voltage = analogRead(A0) / 4096.0 * 5.00;    // Ardunio UNO, no voltage divider required
  //Serial.println("Voltage = " + String(voltage));
  percentage = 2808.3808 * pow(voltage, 4) - 43560.9157 * pow(voltage, 3) + 252848.5888 * pow(voltage, 2) - 650767.4615 * voltage + 626532.5703;
  if (voltage > 4.19) percentage = 100;
  else if (voltage <= 3.50) percentage = 0;
  return String(percentage);
}

double ReadVoltage(byte pin) {
  double reading = adcFilter2.filter(analogRead(pin)); // Reference voltage is 3v3 so maximum reading is 3v3 = 4095 in range 0 to 4095
  if (reading < 1 || reading >= 4095)
    // return -0.000000000009824 * pow(reading,3) + 0.000000016557283 * pow(reading,2) + 0.000854596860691 * reading + 0.065440348345433;
    return -0.000000000000016 * pow(reading, 4) + 0.000000000118171 * pow(reading, 3) - 0.000000301211691 * pow(reading, 2) + 0.001109019271794 * reading + 0.034143524634089;
} // Added an improved polynomial, use either, comment out as required


void IRAM_ATTR myTimerEvent()
{
  // You can send any value at any time.
  // Please don't send more that 10 values per second.
  int ServerUpTimesec;
  int ServerUpTimehour;
  int WiFiStrength;
  String WiFiStrength_Converted;
  if (online == 1)
  {
    //HDC1080
    float hdc1080temp_blynk = TempC;
    float hdc1080hum_blynk = Hum;
    Blynk.virtualWrite(V1, hdc1080temp_blynk);
    Blynk.virtualWrite(V2, hdc1080hum_blynk);
    //Heat Index
    float HeatIndex_blynk = heatInd;
    Blynk.virtualWrite(V3, HeatIndex_blynk);
    //Dew Point
    float DewPoint_blynk = dewPointFast(TempC, Hum);
    Blynk.virtualWrite(V4, DewPoint_blynk);
    //DSB1820
    float DSB_1_blynk = 0.981 * (sensors.getTempC(sensor1)) + 1.58;
    float DSB_2_blynk =sensors.getTempC(sensor2);
    Blynk.virtualWrite(V5, DSB_1_blynk);
    Blynk.virtualWrite(V6, DSB_2_blynk);
    //BH1750
    int LUX_blynk =lux;
    Blynk.virtualWrite(V7, LUX_blynk);
    //ML8511
    float UV_blynk = uvIntensity;
    Blynk.virtualWrite(V8,UV_blynk);
    //BME280
    float PRESS_blynk =climateSensor.getPressure();
    Blynk.virtualWrite(V9,PRESS_blynk);
    //W2S Current Sensor
    float IRR_blynk = Irradiation;
    Blynk.virtualWrite(V10,IRR_blynk);
    //Battery Level
    float BATT_V_blynk = ReadVoltage(27) / 4096.0 * 7.10;
    String BATT_PERC_blynk = readBattery();
    Blynk.virtualWrite(V11,BATT_V_blynk);
    Blynk.virtualWrite(V12,BATT_PERC_blynk);

  }
  else
  {
    Serial.println("Working Offline!");
  }

  if (on == 0)
  {
    led1.on();  // turn the LED on (HIGH is the voltage level)
    on = 1;
  }
  else
  {
    led1.off();    // turn the LED off by making the voltage LOW
    on = 0;
  }
  ServerUpTimesec = ((millis() / 1000));
  Blynk.virtualWrite(V13, ServerUpTimesec);
  ServerUpTimehour = ((millis() / (1000 * 3600)));
  Blynk.virtualWrite(V17, ServerUpTimehour);
  WiFiStrength = WiFi.RSSI();
  if (WiFiStrength <= -100)
    WiFiStrength_Converted = String("No Signal");
  else if (WiFiStrength <= -70)
    WiFiStrength_Converted = String("Poor Signal");
  else if (WiFiStrength <= -50)
    WiFiStrength_Converted = String("Good Signal");
  else if (WiFiStrength <= -30)
    WiFiStrength_Converted = String("Great Signal");
  else
    WiFiStrength_Converted = String("Great Signal");
  Blynk.virtualWrite(V14, WiFiStrength);
  Blynk.virtualWrite(V15, WiFiStrength_Converted);
  Blynk.virtualWrite(V18, WiFi.localIP().toString());
  //Serial.println(WiFiStrength_Converted);
  //Serial.println(ServerUpTime);
}
////-------------------------------------------
//Blynk Emergency Reset Button Code
void(* resetFunc) (void) = 0;
BLYNK_WRITE(V10) { //Reset
  if (param.asInt() == 1) {
    resetFunc();
    delay(5000);
  }
}

////-------------------------------------------
//Void Setup Begins

void setup() {
  Wire.begin();
  Wire.setClock(400000); //set clock speed for I2C bus to maximum allowed for HDC1080
  Serial.begin(112500);  // start serial for output
  //Blynk Setup
  WiFi.mode(WIFI_STA);
  Blynk.begin(auth, ssid, pass);
  timer.setInterval(5000L, CheckConnection);
  timer.setInterval(5000L, myTimerEvent);

  //HDC1080
  tempsensor = HDC1080JS();
  tempsensor.config();

  //DS18B20
  sensors.begin();

  //BH1750
  // Initialize sensor in one-time mode, high  resolution
  sensor.begin(ModeOneTime, ResolutionMid);

  //ML8511
  pinMode(UVOUT, INPUT);
  pinMode(REF_3V3, INPUT);

  //BME280
  climateSensor.begin();
}

void loop() {
  ////-------------------------------------------
  //Blynk Setup
  if (Blynk.connected()) {
    Blynk.run();
  }
  timer.run();
  ////-------------------------------------------
  sensors.requestTemperatures(); // Send the command to get temperatures  - DS18B20

  //HDC1080
  tempsensor.readTempHumid();
  TempC = tempsensor.getTemp();
  Hum = tempsensor.getRelativeHumidity();
  heatInd = heatIndex(1.8 * TempC + 32, Hum); // Pass values to function (converting to farenheit)

  //BH1750
  LuxRead();

  //ML8511
  uvLevel = averageAnalogRead(UVOUT);
  refLevel = averageAnalogRead(REF_3V3);
  //Use the 3.3V power pin as a reference to get a very accurate output value from sensor
  outputVoltage = 3.3 / refLevel * uvLevel;
  uvIntensity = mapfloat(outputVoltage, 0.89, 2.8, 0.0, 15.0); //Convert the voltage to a UV intensity level

  //BME280
  climateSensor.takeForcedMeasurement();

  //WCS Current Senors - Irradiance W/m^2
    /* 1- DC Current & Irradiation */
  finalCurrent = ((averageAnalogRead(36) - ((moduleMiddleVoltage / moduleSupplyVoltage) * 4095)) + Offset) * (moduleSupplyVoltage/(4095 * mVperAmpValue));
  Irradiation = constrain((finalCurrent / ShortCircuitCurrentSTC*10000),0.0,5000.0);

  PrintSensors();
}

void PrintSensors() {
  Serial.print("HDCTemp=");
  Serial.print(TempC);
  Serial.print("C, RH=");
  Serial.print(Hum);
  Serial.print("%, HI=");
  Serial.print(heatInd);
  Serial.print("C, DP_Fast=");
  Serial.print(dewPointFast(TempC, Hum));
  Serial.print("C, DSB_1=");
  Serial.print(0.981 * (sensors.getTempC(sensor1)) + 1.58); //Calibration Factor
  Serial.print("C, DSB_2=");
  Serial.print(sensors.getTempC(sensor2));
  Serial.print("C, LUX=");
  Serial.print(lux);
  Serial.print("lux, UV_Ind=");
  Serial.print(uvIntensity, 4);
  Serial.print(" , Press=");
  Serial.print(climateSensor.getPressure());
  Serial.print(" kPa Irra=");
  Serial.print(Irradiation,5);
  Serial.print(" W/m^2 Batt Voltage=");
  Serial.print(ReadVoltage(27) / 4096.0 * 7.10);
  Serial.print(" V Batt Percentage=");
  Serial.print(readBattery());
  Serial.println("%");
}


////-------------------------------------------
void CheckConnection() {   // check every 11s if connected to Blynk server
  if (!Blynk.connected()) {
    online = 0;
    yield();
    if (WiFi.status() != WL_CONNECTED)
    {
      Serial.println("Not connected to Wifi! Connect...");
      Blynk.connectWiFi(ssid, pass); // used with Blynk.connect() in place of Blynk.begin(auth, ssid, pass, server, port);
      WiFi.begin(ssid, pass);
      delay(400); //give it some time to connect
      if (WiFi.status() != WL_CONNECTED)
      {
        Serial.println("Cannot connect to WIFI!");
        online = 0;
      }
      else
      {
        Serial.println("Connected to wifi!");
      }
    }

    if ( WiFi.status() == WL_CONNECTED && !Blynk.connected() )
    {
      Serial.println("Not connected to Blynk Server! Connecting...");
      Blynk.connect();  // // It has 3 attempts of the defined BLYNK_TIMEOUT_MS to connect to the server, otherwise it goes to the enxt line
      if (!Blynk.connected()) {
        Serial.println("Connection failed!");
        online = 0;
      }
      else
      {
        online = 1;
      }
    }
  }
  else {
    Serial.println("Connected to Blynk server!");
    online = 1;
  }
}
////-------------------------------------------
////--------------------FIN--------------------