HAWT - Axial Flux Generator
First personal project since starting work full time in Boston! SLS 3D Printing will allow you to make ANY geometry you would like - a fabricator’s dream!
Summary
- COST: ~ $250 CAD
- Financing: Personal :(
- TIME TO COMPLETE: ~ 2.5 Months (~ 100 working hours)
- Ideation: 15 hours
- Design: 30 hours
- Mechanical Build: 15 hours
- Electrical Build: 20 hours
- Software Build: 5 hours
- Integration Hell: 5 hours
- Testing: 10 hours
Introduction
I have been curious about wind turbine design for a while and started a deep dive on self-pitching horizontal axis wind turbines (HAWT) 1 summer ago that will pitch the blades out of the wind by centripetal force when the wind speeds are too high slowing the rotation as a function of the wind speed. During that time I stumbled across a fantastic book called Wind Machines by Frank R. Elridge that regardless if you are interested in wind machines are not should check out just for the amazing illustrations and graphs. Supposed ‘New’ wind turbine designs have started to emerge recently as cheap clickbait or an easy way to VC’s purse that promises to be impossibly efficient or generate large amounts of power in low wind. It’s great to read through the taxonomy section of the book and see so many of these ‘New’ designs have been around since at least 1975 when this book was published!
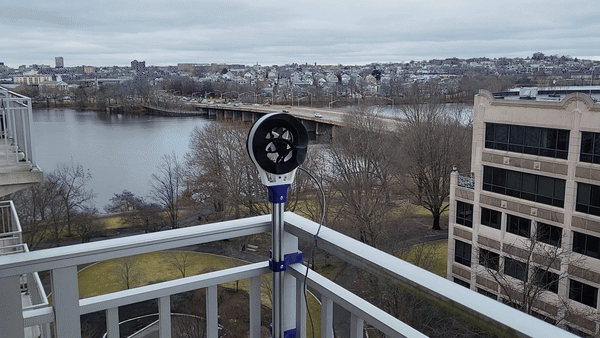
Realizing I was not going to break physics by harnessing large amounts of energy with the low-speed wind (~3.3 m/s) swirling around my apartment in Boston I decided to focus on learning how to design an axial generator and 3D print some really beautiful parts along the way!
Build
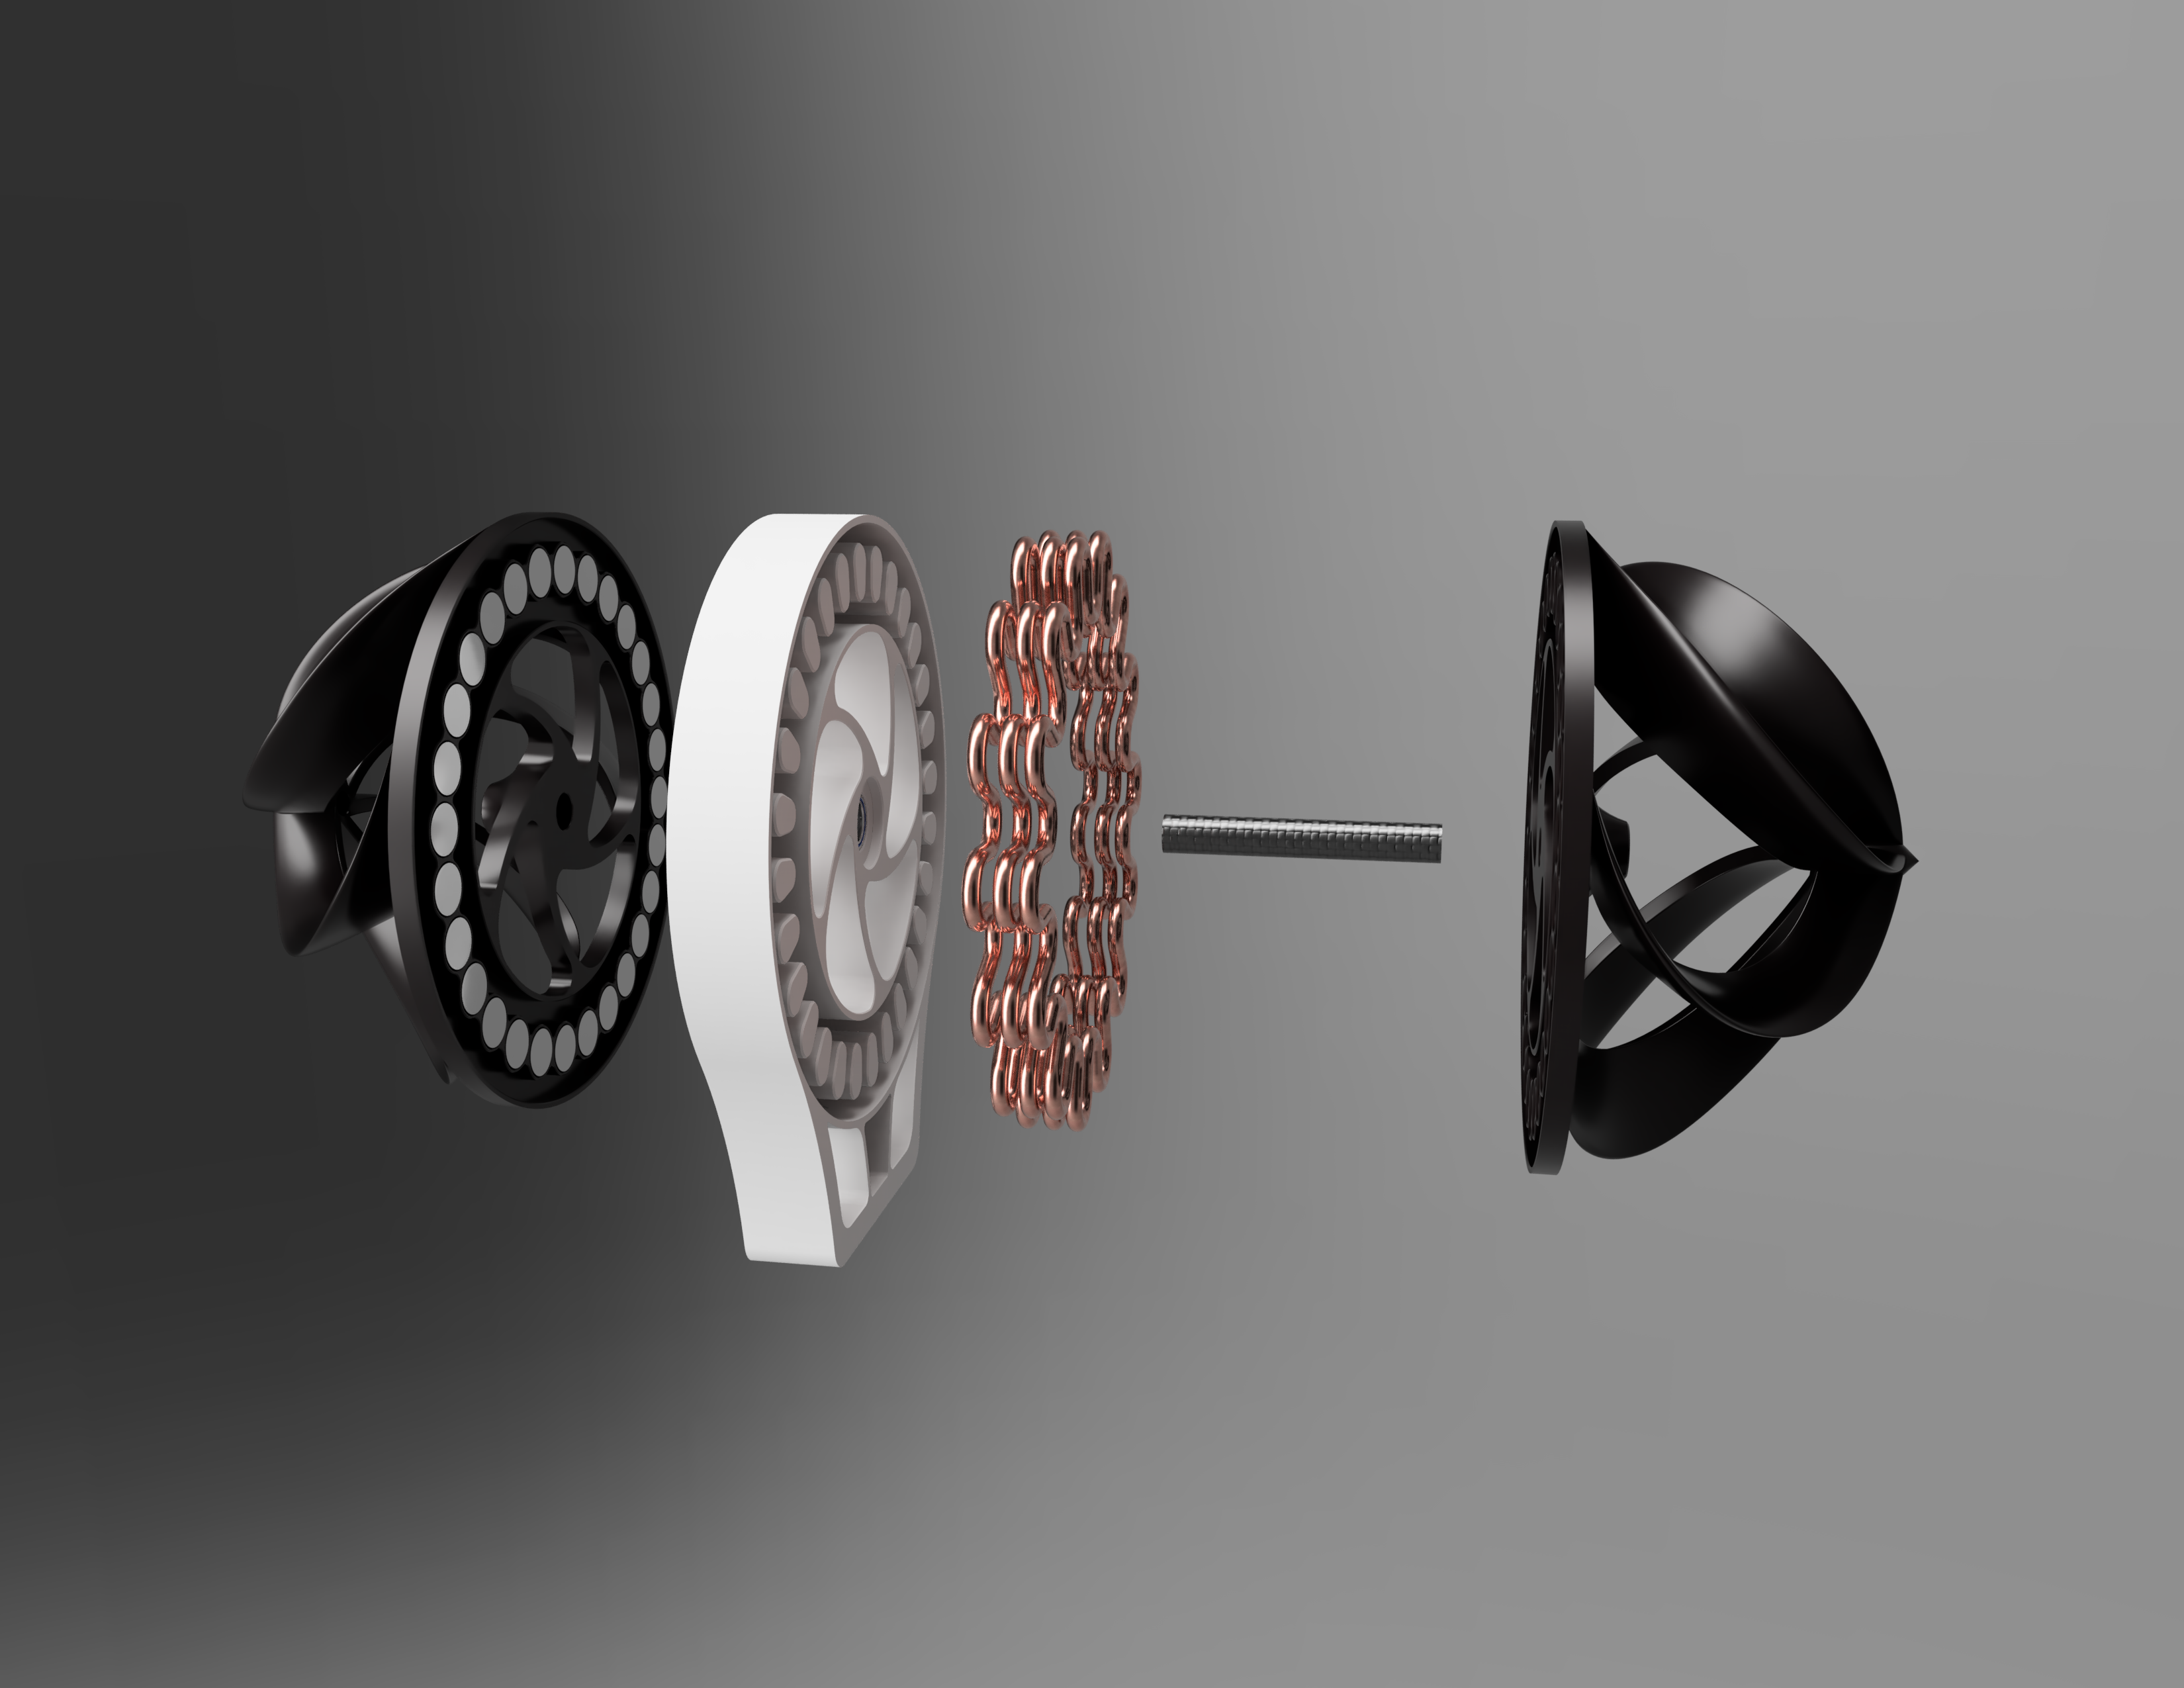
Mechanical Design
The fundamental limit in wind turbine design is the ‘Betz Limit’ which says that only 59.3% of the kinetic energy in the wind can be used to spin the turbine to generate electricity 1. To derive this equation it can be shown that the power in a moving fluid in a cylinder with cross-section ‘S’ and velocity ‘v’ and fluid density ‘$\rho$’ is: \(Power = {\rho*S*v^3 \over 2}\). The cubic relationship with wind speed shows us why we won’t get much power from the low-speed wind but we can play with the ‘S’ term by increasing the area on which the wind can act and generate rotation. To do this we are going to sweep a NACA Airfoil (SG6043) through a half-dome to allow incident wind to pass over that airfoil generating a new lift vector so we have a lift type turbine over a drag type.
To give the generator a fighting chance to overcome cogging/detent torque I worked hard to lower its moment of Inertia & friction as much as possible by:
- Using a hollow carbon fiber spar as the axle over a steel rod (30x lower Moment of Inertia)
- Hollowing out any excess material around the magnets (largest radius)
- Used high-quality rolling bearings (hybrid ceramic) as they don’t require grease to protect from oxidation on steel bearings
Electrical Design
Coil Design
In doing some research I stumbled across a really interesting way to make an axial flux generator using a “serpentine” coil. The big advantage is that it’s much easier to wind & assemble than traditional coils as you simply make one large continuous loop the correct length and then bend it to the final shape - Easy!
Making motors is an incredible optimization problem but the nice thing is that when the going gets tough we can go back to the fundamentals. When looking at Faraday’s Law for magnetic force on a current carrying wire we see that \(EMF (V) = v*L*\beta*\sin(\theta)\) which means I can do the following optimizations:
- Velocity (v): the velocity of the magnetic field relative to the wire/coils is controlled by the wind - can’t control this.
- Length (L): To have a longer length of wire I need to either have larger rotors (I fixed this at 160mm as a fabrication constraint) or have thinner wires to have more wire wraps. The thinner the wire higher the resistance of the wire meaning it can handle fewer electrons per unit length lowering the current carrying capacity hence it’s an optimization problem
Fun(ish) Fact: This wire length optimization problem is one of the primary root causes of fires in wind turbines. In abnormal wind speeds too much current is generated relative to the wire’s current carrying capacity resulting in high temperatures & possible meltdown.2
$\beta$: To increase the magnetic field strength you want the smallest possible air gap between the magnets & the coils and/or using stronger magnets. Halfway through the project, I switched from N35 to N52 the strongest grade of neodymium magnets.
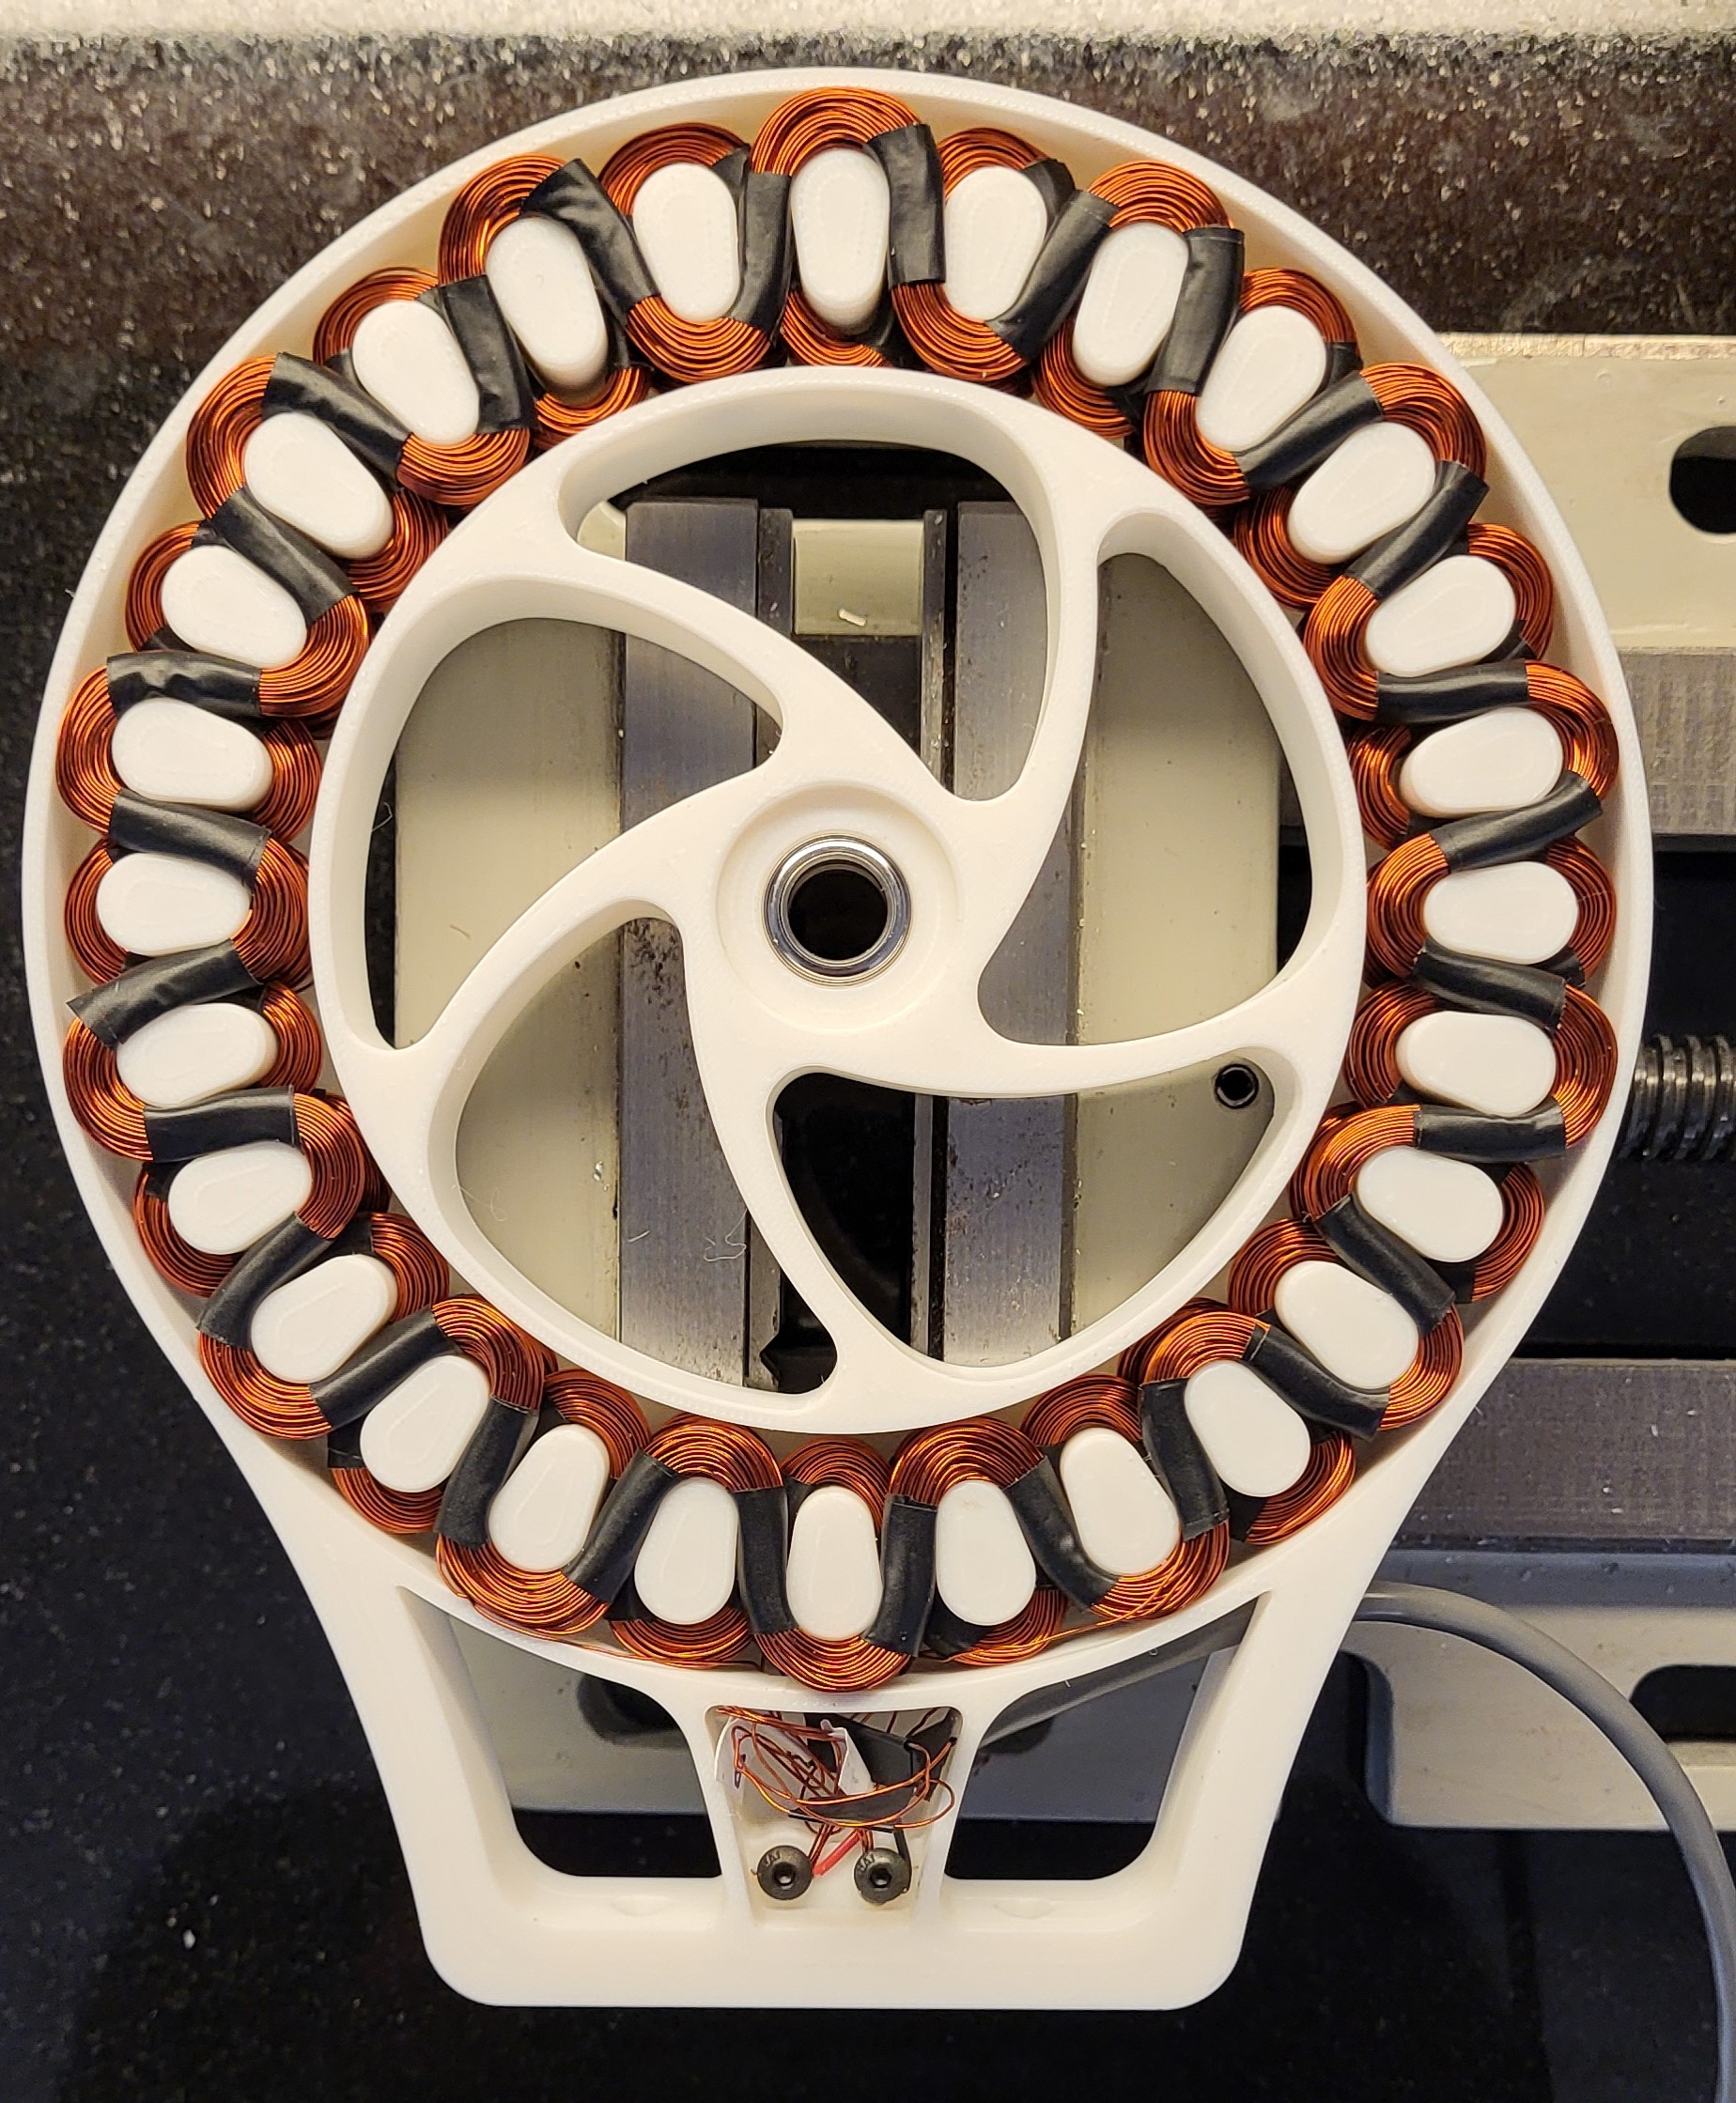
$\sin(\theta)$: Ideally you want the wire/coils orthogonal to the current as $\sin(90) = 1$. The only parts of the wire in the image below are the sections of the coil with black electrical tape as they are ~90° to the magnets. The arcs at the top and bottom don’t generate any electricity as they are ~0° to the magnetic field and wasted copper. One nice thing about the serpentine winding is that because the coils are continuous we have half as many ‘arc sections’ as with traditional winding meaning higher power density due to less wasted copper!
 Isn’t it just beautiful!
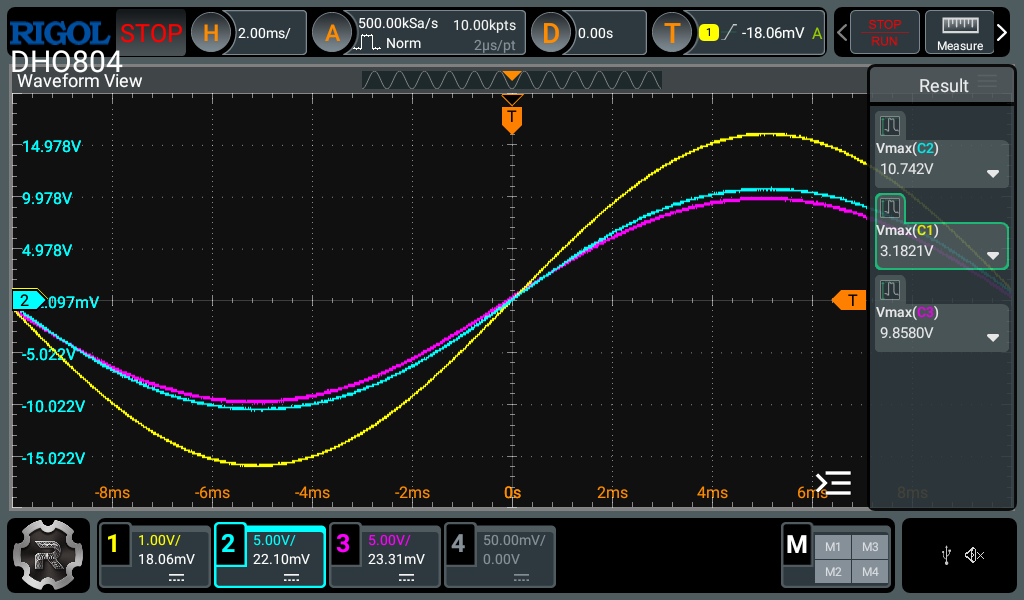 Oscilliscope Output showing the Voltage produced by each phase. The inner coil (yellow) produces less voltage as it is further from the magnets
Above you can see the voltage produced by each coil (3 stacked coils) with the center coil furthest from the magnets producing the lowest. Originally I wanted to do 3-phase rectificatons with 3 coils in a WYE configuration but struggled to get a good ~60° offset between the coils. Ultimately I ended up just wiring the coils in series to combine their output voltages to ~24V. I wanted the higher volts as the cheap rectification components will drop some volts & the lower current means a squared less power losses.
Coil Design
To wind the coils I build a simple coil winding setup with an encoder to measure the number of turns so I know when to stop winding. The cutouts where my finger is serves a double purpose as they are indexing holes for wrapping the electrical tape marking where to bend the wire for assembly into the rotor body!
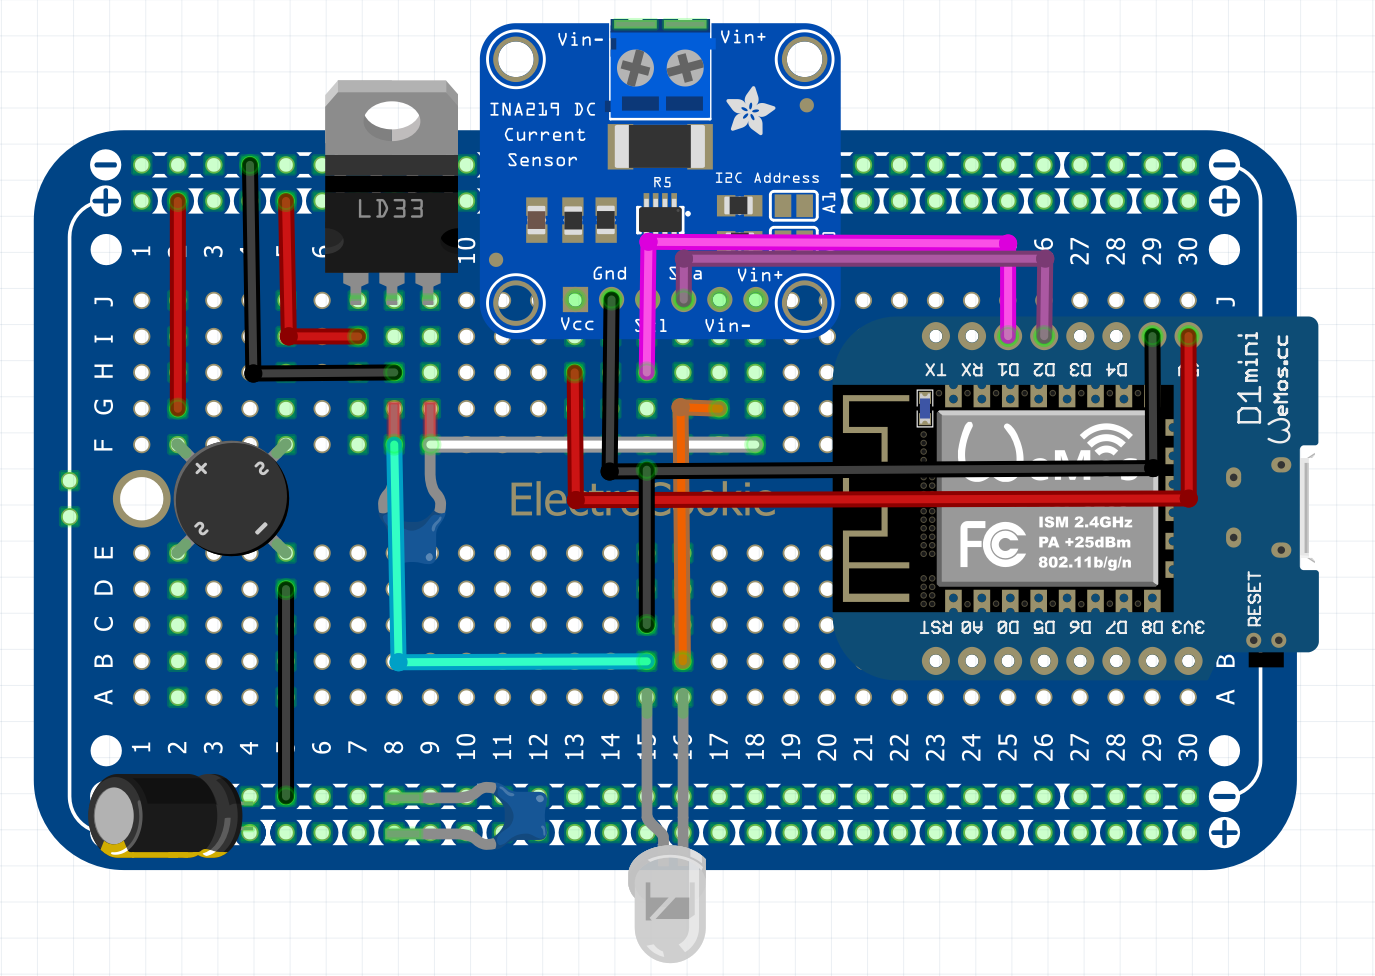
PCB
The AC output from the 3 coils in series is passed through a full bridge rectifier and then smoothed with some capacitors before passing through a 12V voltage regulator. The output is then passed to a small 12V LED but not before passing through the INA219 current sensor. This sensor collects high side voltage, current & ultimately power produced by the wind turbine which sends this data over WiFi with an ESP32 to a Google sheet acting as a database. I am then able to plot this data to see how much power I am generating during short bursts of wind!
 Fritzing render of PCB showing layout
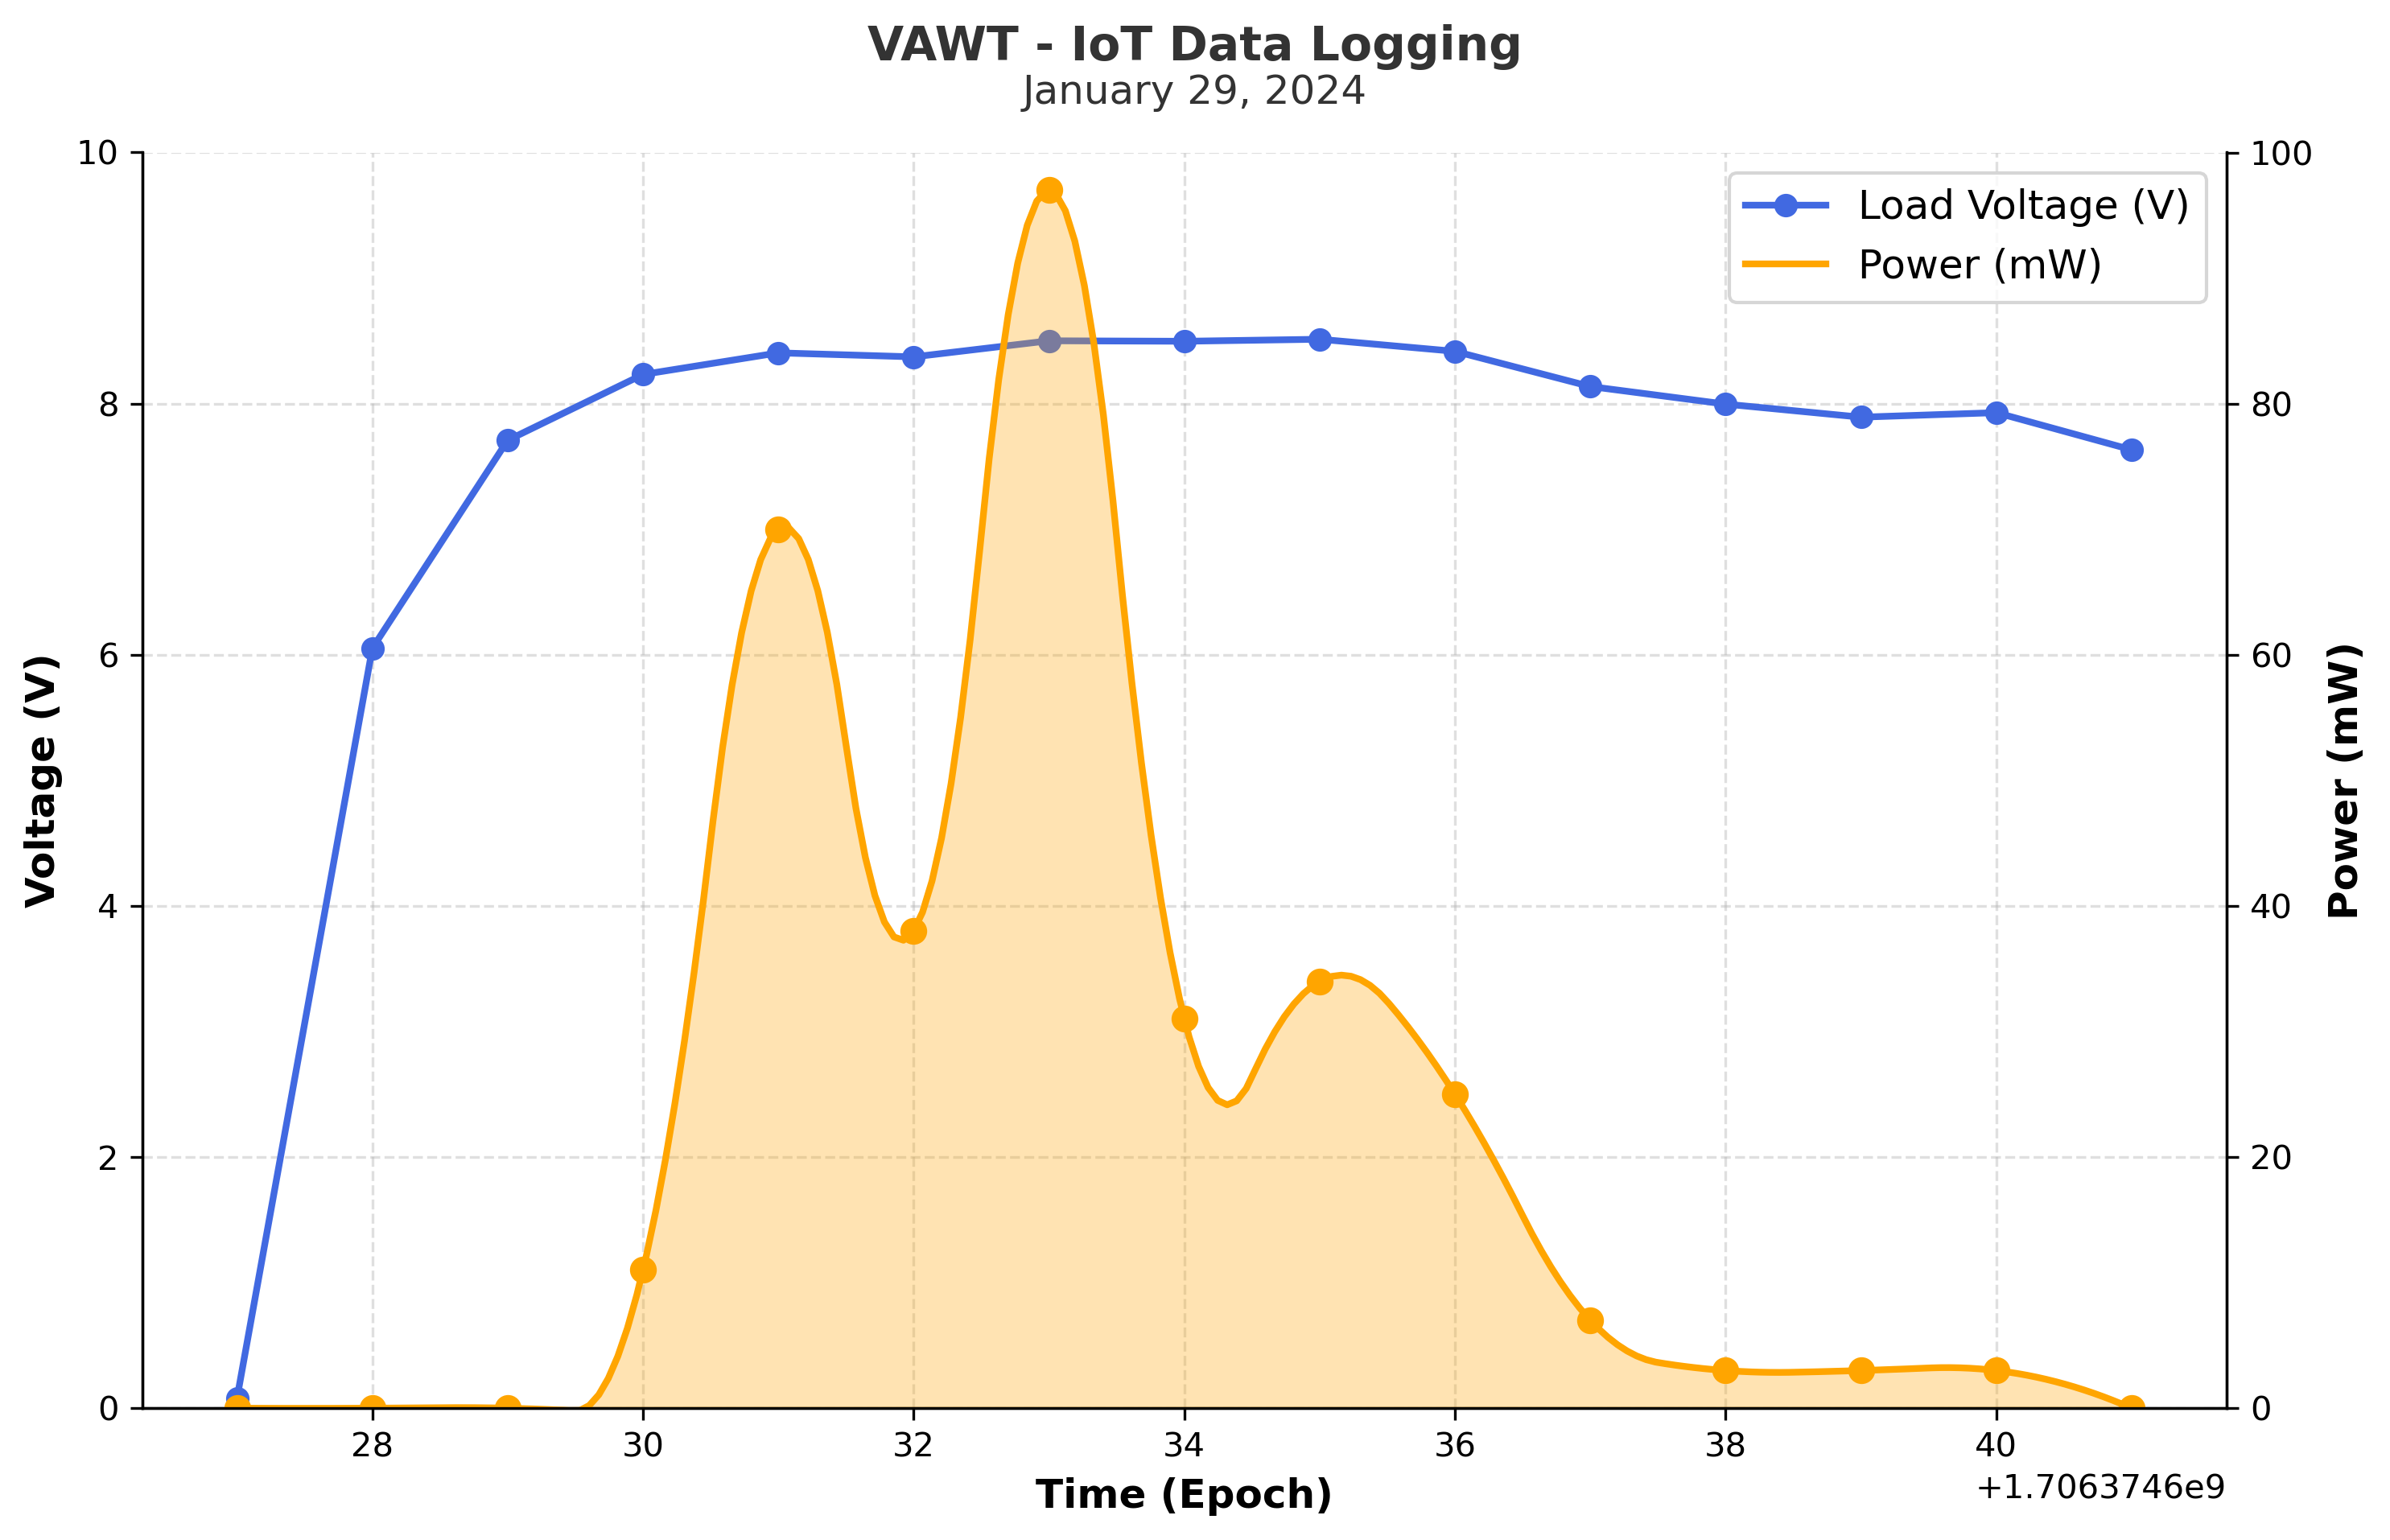 Sample Output from a gust of wind!
Code - Google Sheets
1
2
3
4
5
6
7
8
9
10
11
12
13
14
15
16
17
18
19
20
21
22
23
24
25
26
27
28
29
30
31
32
33
34
35
36
37
38
39
40
41
42
43
44
45
46
47
48
49
50
51
52
53
54
55
56
57
58
59
60
61
62
63
64
65
66
67
68
69
70
71
72
73
74
75
76
77
78
79
80
81
82
83
84
85
86
87
88
89
90
91
92
93
94
95
96
97
98
99
100
101
102
103
104
105
106
107
108
109
110
111
112
113
114
115
116
117
118
119
120
121
122
123
124
125
126
127
128
129
130
131
132
133
134
135
136
137
138
139
140
141
142
143
144
145
146
147
148
149
150
151
152
153
154
155
156
157
158
159
160
161
162
163
164
165
166
167
168
169
170
171
172
173
174
175
176
177
178
179
180
181
182
183
184
185
186
187
188
189
190
191
192
193
194
195
196
197
198
199
200
201
202
203
204
/*
Oliver Kiessling


VAWT Data Logging
*/


#include <Arduino.h>
#include <ESP8266WiFi.h>
#include "time.h"
#include <ESP_Google_Sheet_Client.h>
#include <NTPClient.h>
#include <WiFiUdp.h>
#include <Wire.h>
#include <Adafruit_INA219.h>


//Setup INA219 Chip
Adafruit_INA219 ina219;


// For SD/SD_MMC mounting helper
#include <GS_SDHelper.h>


#define WIFI_SSID "XXXXXXX"
#define WIFI_PASSWORD "XXXXXXX"


// Google Project ID
#define PROJECT_ID "vawt-iot-datalogging"


// Service Account's client email
#define CLIENT_EMAIL "XXXXXXX"


// Service Account's private key
const char PRIVATE_KEY[] PROGMEM = "XXXXXXX"


// The ID of the spreadsheet where you'll publish the data
const char spreadsheetId[] = "XXXXXXX"


// Timer variables
unsigned long lastTime = 0;
unsigned long timerDelay = 5000;


// Token Callback function
void tokenStatusCallback(TokenInfo info);


// NTP server to request epoch time
const char* ntpServer = "pool.ntp.org";


// Define NTP Client to get time
WiFiUDP ntpUDP;
NTPClient timeClient(ntpUDP, "pool.ntp.org");


// Variable to save current epoch time
unsigned long epochTime;


// Function that gets current epoch time
unsigned long getTime() {
  timeClient.update();
  unsigned long now = timeClient.getEpochTime();
  return now;
}


void setup(){


    Serial.begin(115200);
    Serial.println();
    Serial.println();


    //Configure time
    configTime(0, 0, ntpServer);


    //Confugiruing the INA219
    if (! ina219.begin()) {
      Serial.println("Failed to find INA219 chip");
      while (1) { delay(10); }
     }
    // To use a slightly lower 32V, 1A range (higher precision on amps):
    //ina219.setCalibration_32V_1A();
    // Or to use a lower 16V, 400mA range (higher precision on volts and amps):
    ina219.setCalibration_16V_400mA();


    GSheet.printf("ESP Google Sheet Client v%s\n\n", ESP_GOOGLE_SHEET_CLIENT_VERSION);


    // Connect to Wi-Fi
    WiFi.setAutoReconnect(true);
    WiFi.begin(WIFI_SSID, WIFI_PASSWORD);

    Serial.print("Connecting to Wi-Fi");
    while (WiFi.status() != WL_CONNECTED) {
      Serial.print(".");
      delay(1000);
    }
    Serial.println();
    Serial.print("Connected with IP: ");
    Serial.println(WiFi.localIP());
    Serial.println();


    // Set the callback for Google API access token generation status (for debug only)
    GSheet.setTokenCallback(tokenStatusCallback);


    // Set the seconds to refresh the auth token before expire (60 to 3540, default is 300 seconds)
    GSheet.setPrerefreshSeconds(10 * 60);


    // Begin the access token generation for Google API authentication
    GSheet.begin(CLIENT_EMAIL, PROJECT_ID, PRIVATE_KEY);
}


void loop(){
    // Call ready() repeatedly in loop for authentication checking and processing
    bool ready = GSheet.ready();


    if (ready && millis() - lastTime > timerDelay){
        lastTime = millis();


        FirebaseJson response;


        Serial.println("\nAppend spreadsheet values...");
        Serial.println("----------------------------");


        FirebaseJson valueRange;


        float shuntvoltage = 0;
        float busvoltage = 0;
        float current_mA = 0;
        float loadvoltage = 0;
        float power_mW = 0;


        //Read Currents & Voltages
        shuntvoltage = ina219.getShuntVoltage_mV();
        busvoltage = ina219.getBusVoltage_V();
        current_mA = ina219.getCurrent_mA();
        power_mW = ina219.getPower_mW();
        loadvoltage = busvoltage + (shuntvoltage / 1000);
        // Get timestamp
        epochTime = getTime();


        if (busvoltage >= 0.1) {
          valueRange.add("majorDimension", "COLUMNS");
          valueRange.set("values/[0]/[0]", epochTime);
          valueRange.set("values/[1]/[0]", shuntvoltage);
          valueRange.set("values/[2]/[0]", busvoltage);
          valueRange.set("values/[4]/[0]", loadvoltage);
          valueRange.set("values/[5]/[0]", current_mA);
          valueRange.set("values/[6]/[0]", power_mW);
        }


        // For Google Sheet API ref doc, go to https://developers.google.com/sheets/api/reference/rest/v4/spreadsheets.values/append
        // Append values to the spreadsheet
        bool success = GSheet.values.append(&response /* returned response */, spreadsheetId /* spreadsheet Id to append */, "Sheet1!A1" /* range to append */, &valueRange /* data range to append */);
        if (success){
            response.toString(Serial, true);
            valueRange.clear();
        }
        else{
            Serial.println(GSheet.errorReason());
        }
        Serial.println();
        Serial.println(ESP.getFreeHeap());
    }
}


void tokenStatusCallback(TokenInfo info){
    if (info.status == token_status_error){
        GSheet.printf("Token info: type = %s, status = %s\n", GSheet.getTokenType(info).c_str(), GSheet.getTokenStatus(info).c_str());
        GSheet.printf("Token error: %s\n", GSheet.getTokenError(info).c_str());
    }
    else{
        GSheet.printf("Token info: type = %s, status = %s\n", GSheet.getTokenType(info).c_str(), GSheet.getTokenStatus(info).c_str());
    }
}